
ErpLite · Online study · Student lifecycle
From application to graduation — who does what, and what the system handles for you
The University Suite spans several apps — Admissions & Academics, Student Finance, Accounting, Sales and the LMS — for an online institution. This manual walks the whole journey in the order you actually work it, names the exact screen for every step, shows a real screenshot of each one, and flags what is done for you automatically versus what you trigger. Instructors and students each get their own branded portal.
Admission & application fee
How a person gets from an interested applicant to accepted and placed into a program.
Applicant appliesطلب التحاق
ApplicantPublic website form (built in the CMS)/admissions/apply
1) Fill in personal details, national ID and academic background.
2) Upload the required documents.
3) Where the form asks, pick their program preferences in order.
4) Submit the application.
Creates an admission record (طلب قبول) with an application number and emails a confirmation. The applicant can later track status and accept an offer through a secure link — no login needed.
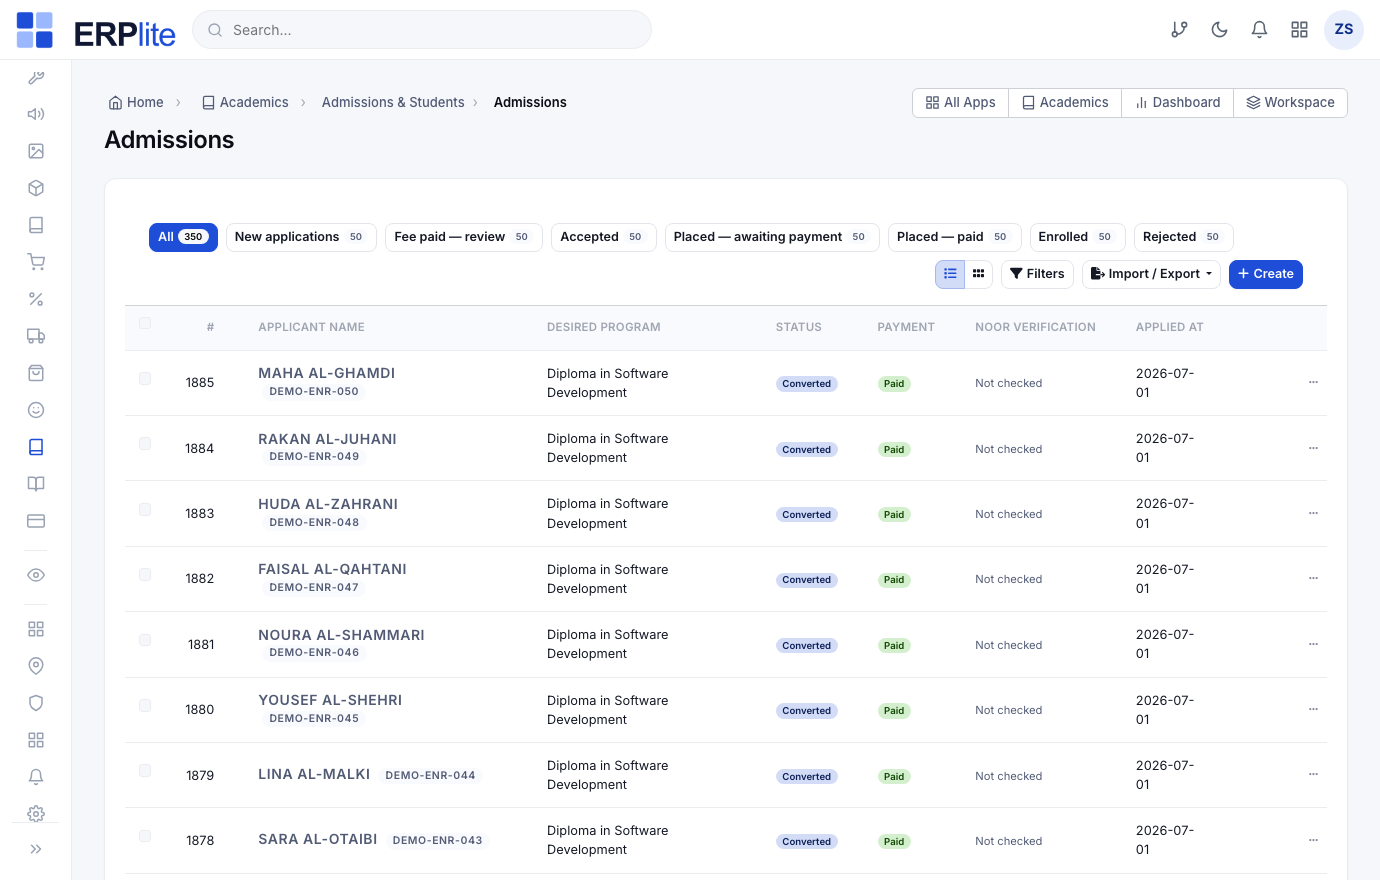
Work the admissions queueالقبول
RegistrarAcademics › Admissions/admin/admissions
The list is a staged funnel — each tab has a live count:
1) All · New applications · Fee paid — review · Accepted.
2) Placed — awaiting payment · Placed — paid · Enrolled · Rejected.
Filter by program, year, payment or ID-verification status, tick rows, then Initial-Accept, Reject or Waitlist in bulk.
Shows an identity-verification badge when that check is switched on, and moves records between tabs automatically as fees are paid and decisions are made.
Application fee — invoice & online paymentرسوم القبول
AutomaticStudent Finance › Admission Fee Invoices · Fee Payments/admin/admission-fee-invoices
On submission it raises a draft fee invoice against a shared Applicants account. The applicant pays online; the money lands in a payment-gateway clearing account and the invoice posts and closes. Home-country applicants are tax-exempt; others are taxed.
Nothing to create — just monitor these two lists (فواتير رسوم القبول · مدفوعات رسوم القبول). Every attempt shows here with its status: pending, paid, failed or refunded.
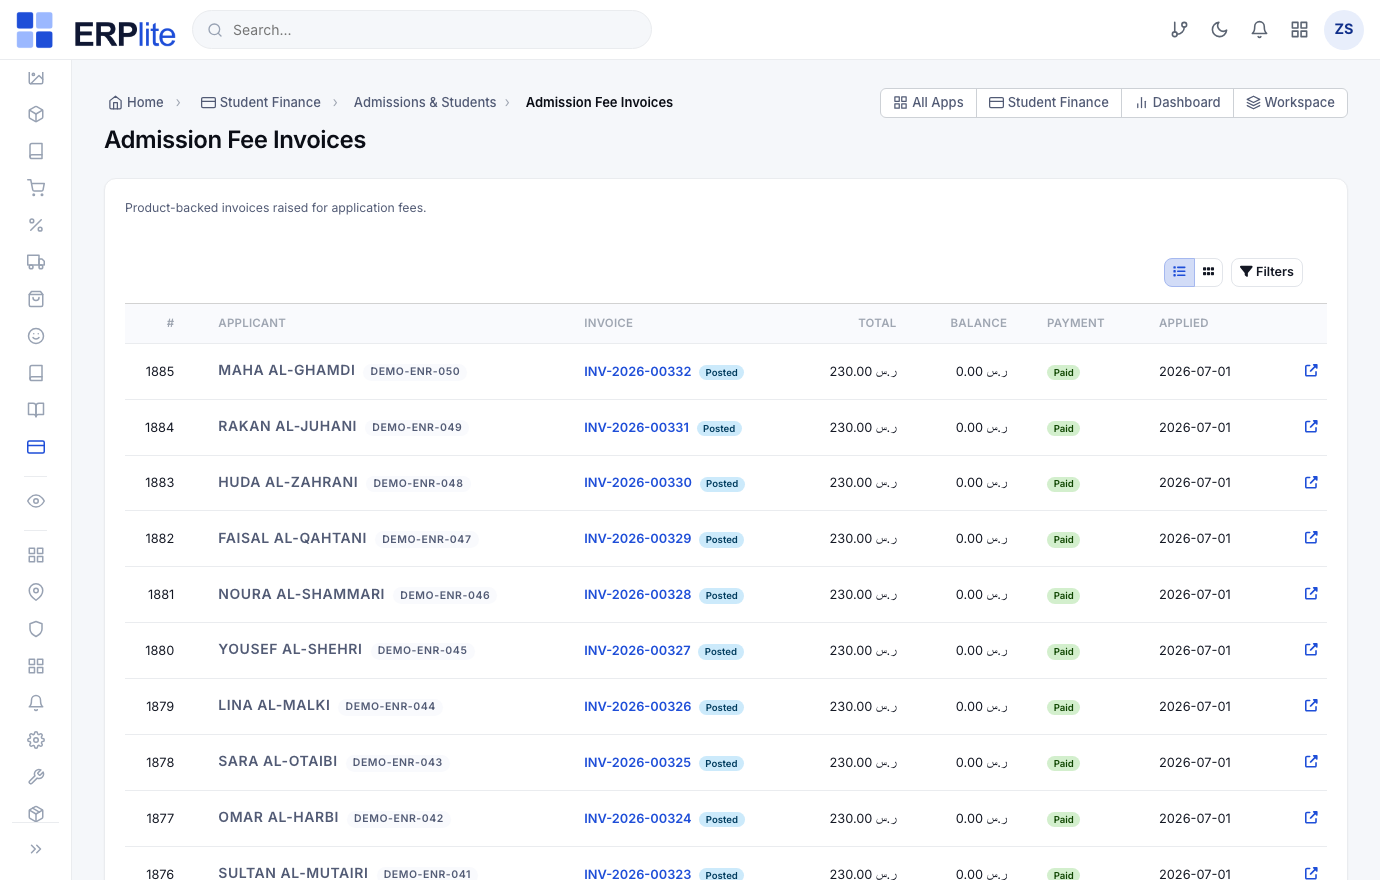
The application fee (رسوم الطلب) and the tuition are two different things, in different places. This fee is handled here; tuition comes later (Stage D) — only after the applicant becomes a student.
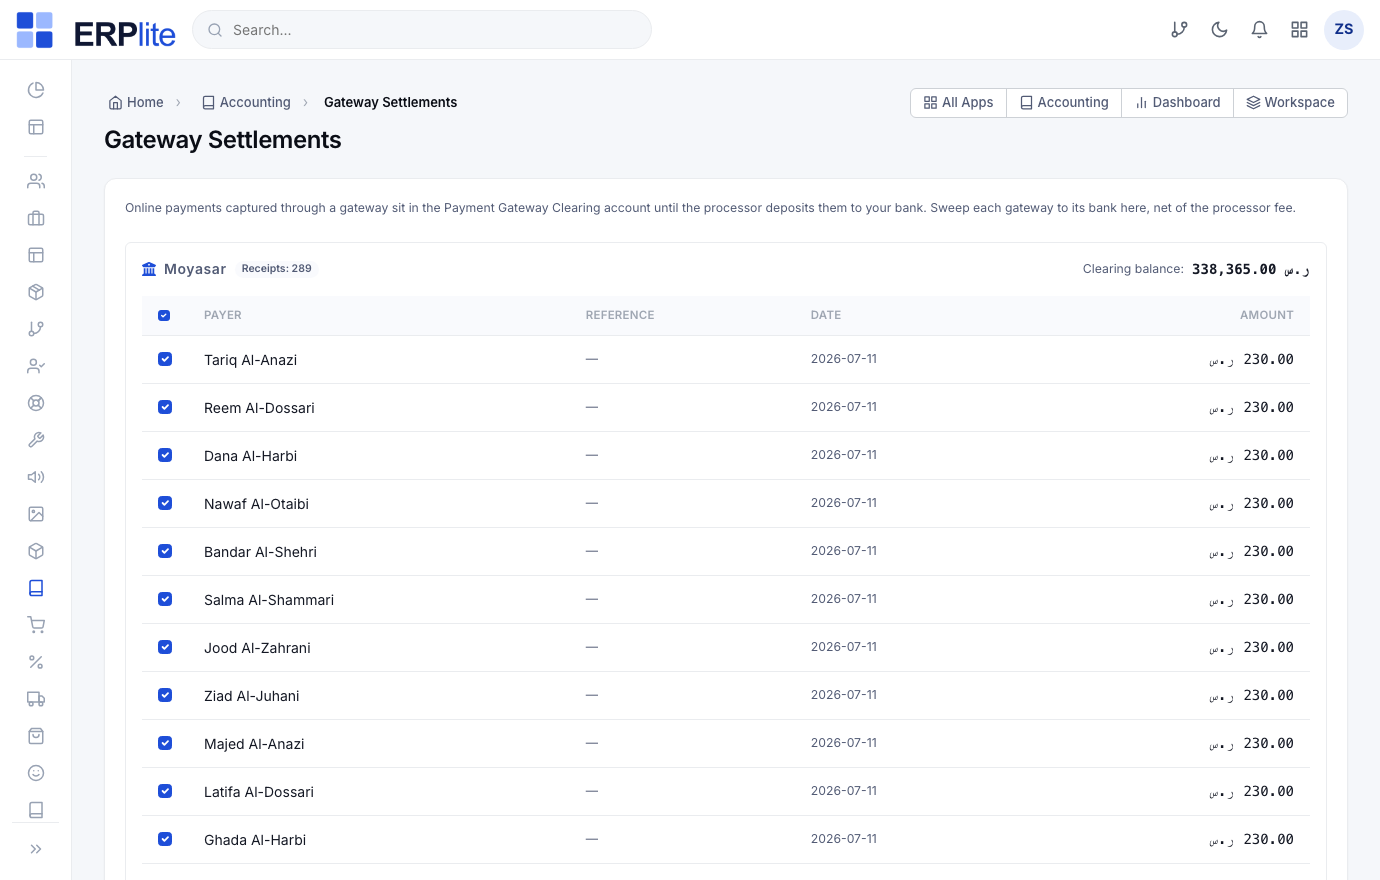
Settle the gateway to your bankتسويات بوابة الدفع
FinanceAccounting › Gateway Settlements/admin/gateway-settlements
When the processor deposits into your bank:
1) Tick the receipts that deposit covered.
2) Enter the processor fee it withheld.
3) Press Settle selected.
Moves that money out of the clearing account into your bank and books the processor fee as an expense. Un-ticked receipts stay in clearing for the next deposit.
Review & place applicants into programsتوزيع البرامج
RegistrarAcademics › Program Placement/admin/placement
The intake year & term come from Admission Settings (shown at the top — “Placing cohort: 2026/2027 — Fall 2026”).
1) Choose a placement mode: Merit, Preference order, Hybrid — score first, then preference order, or Manual.
2) Press Run Proposal.
3) Review the “Records ready for placement” table and adjust any assignment.
4) Open the proposal and press Confirm.
Assigns eligible applicants to programs by capacity, rank and each program minimum GPA, then moves them to Placed — awaiting payment (موزّع). Placement ONLY places — nobody becomes a student here; that happens at Cohort Placement, after the registration fee is paid.
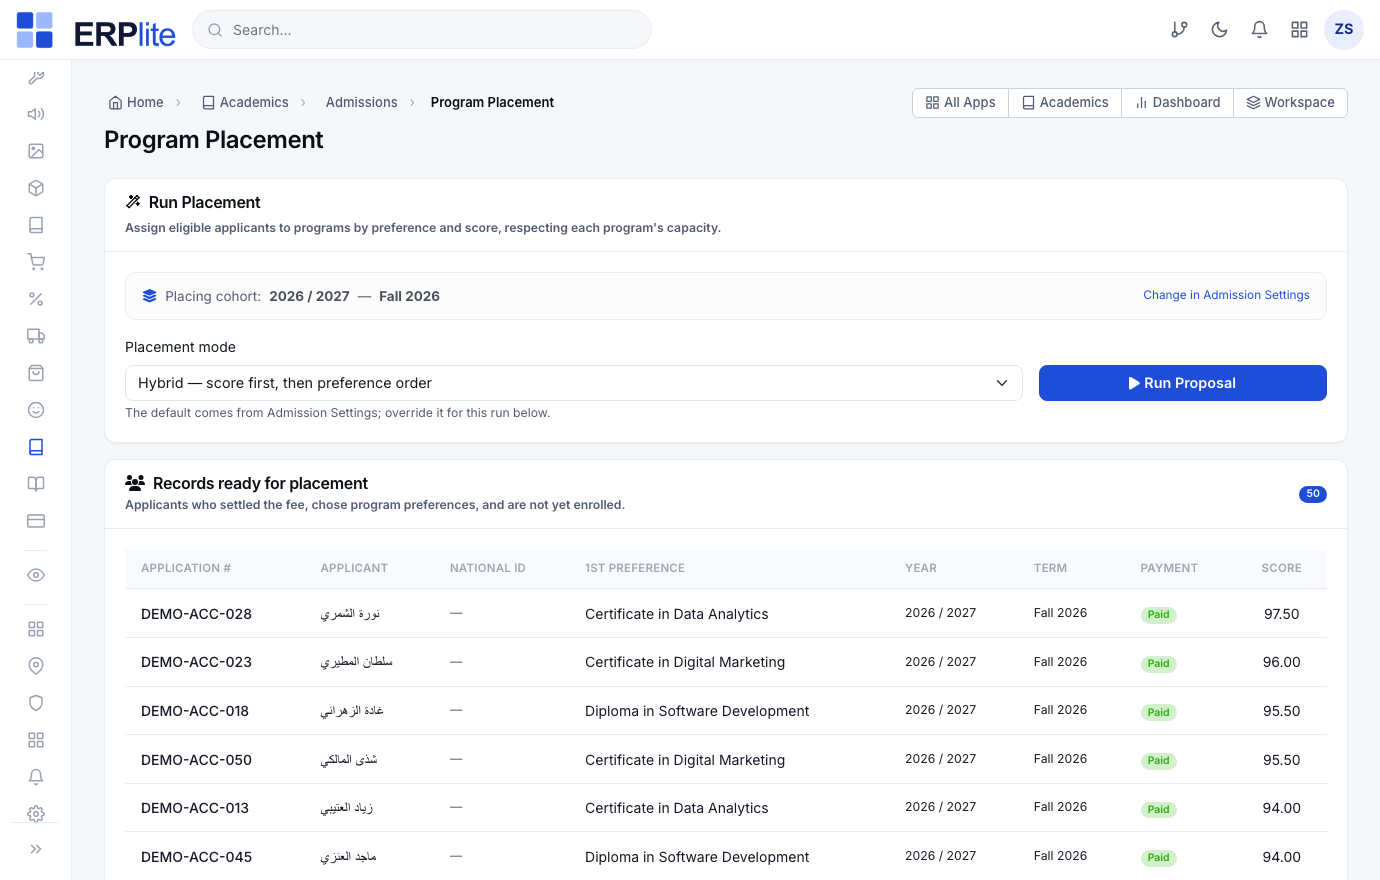
Only applicants who paid the application fee, chose program preferences, and are not already enrolled appear as ready for placement.
Pay the registration fee & become a student
A placed applicant pays the registration fee (held as a deposit); Cohort Placement then turns them into an enrolled student — in one wizard.
Collect the registration feeرسوم التسجيل — دفعة مقدمة
RegistrarAcademics › Admissions › Placed — awaiting payment tab/admin/admissions
1) Open the Placed — awaiting payment tab.
2) Send the registration-fee link (single row or in bulk).
The amount follows the global Tuition payment type in Admission Settings: the full tuition, or the first installment — the program price ÷ its total terms (years × terms/year).
The checkout shows the amount with tax broken out (net + VAT); exempt nationalities pay none. On payment the money is held in a Student Deposits liability — no student, no order, no revenue yet — and the applicant moves to Placed — paid. A refund drops them back to awaiting.
Cohort Placement — the wizardتسكين الدفعات
RegistrarAcademics › Cohort Placement/admin/cohort-placement
The page lists each program with “X ready · X awaiting payment”. Then:
1) Press Place into cohort on a program to open the wizard (paid applications come pre-selected).
2) Name the cohort.
3) Pick the start academic year & term (defaulted from Admission Settings).
4) Adjust the term map — one row per plan term, auto-advancing across years.
5) Press Create cohort & enroll students.
Everything in the pivot list below, in one transaction. The wizard refuses to run if the program study plan has no courses yet (it links you to the builder).
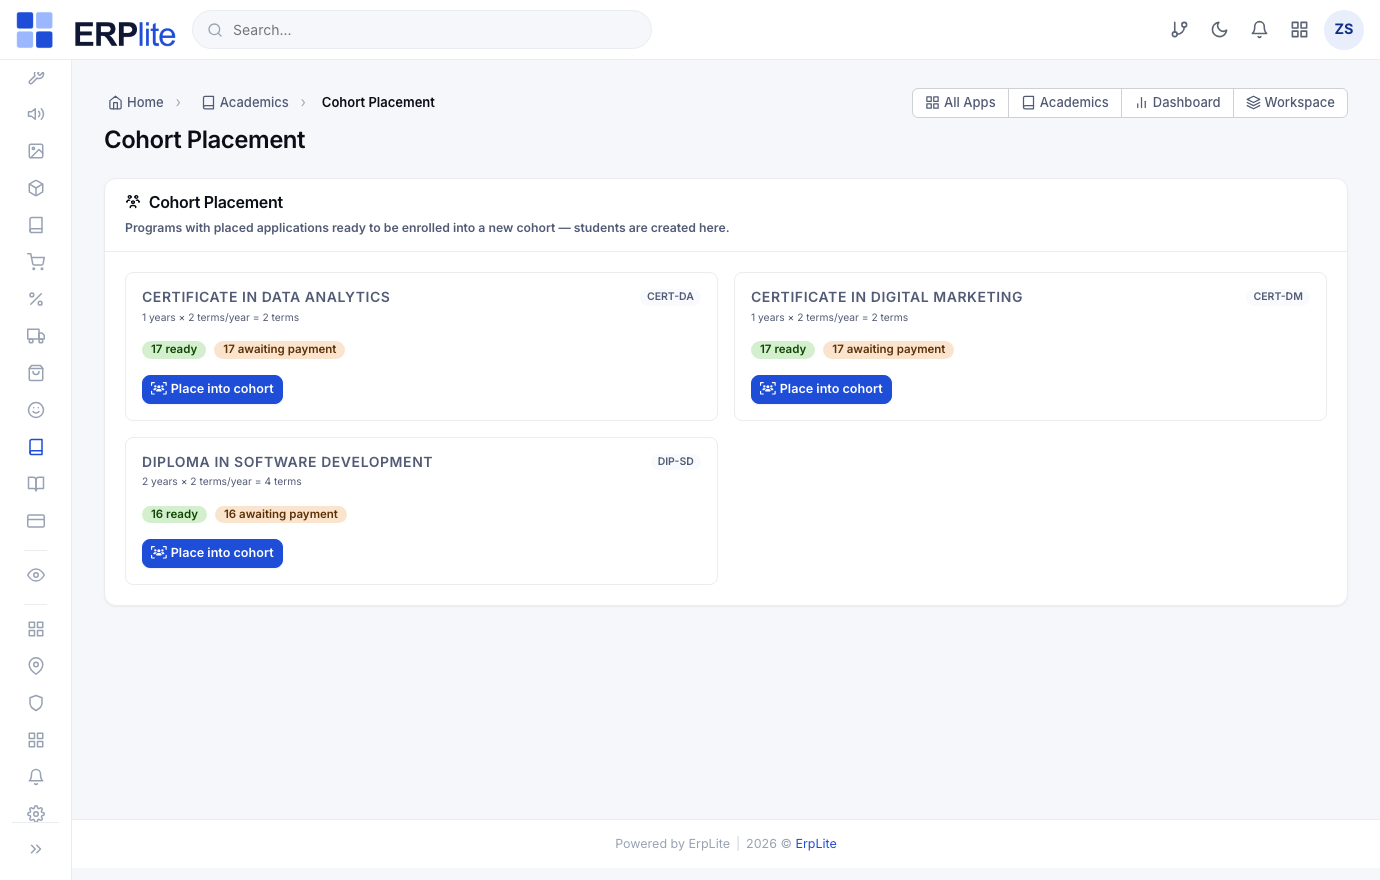
The moment an applicant becomes a student
Pressing Create cohort & enroll students on the Cohort Placement page does all of this automatically:
- ✓Creates the cohort (الدفعة) — with its start term, its pinned study plan, and the term map (plan term → real academic year + term) that section distribution and installment due dates read.
- ✓Creates each student record + a customer/AR account, an active cohort membership, and the academic number.
- ✓Raises the confirmed tuition order — in installment mode when the payment type is per-term — taxed per the program exempt-countries list.
- ✓Builds the installment schedule: one installment per program term, due on each mapped term start date, tax split exactly across the slices.
- ✓Posts the first installment invoice and settles it with the held registration fee (the deposit is released onto the student account) — installment 1 shows paid immediately.
- ◐Emails a student-portal invitation — only if you switched that on (off by default).
Defaults (intake year/term, tuition payment type, exempt home country) live in Academics › Admission Settings — /admin/admission-settings — إعدادات القبول.
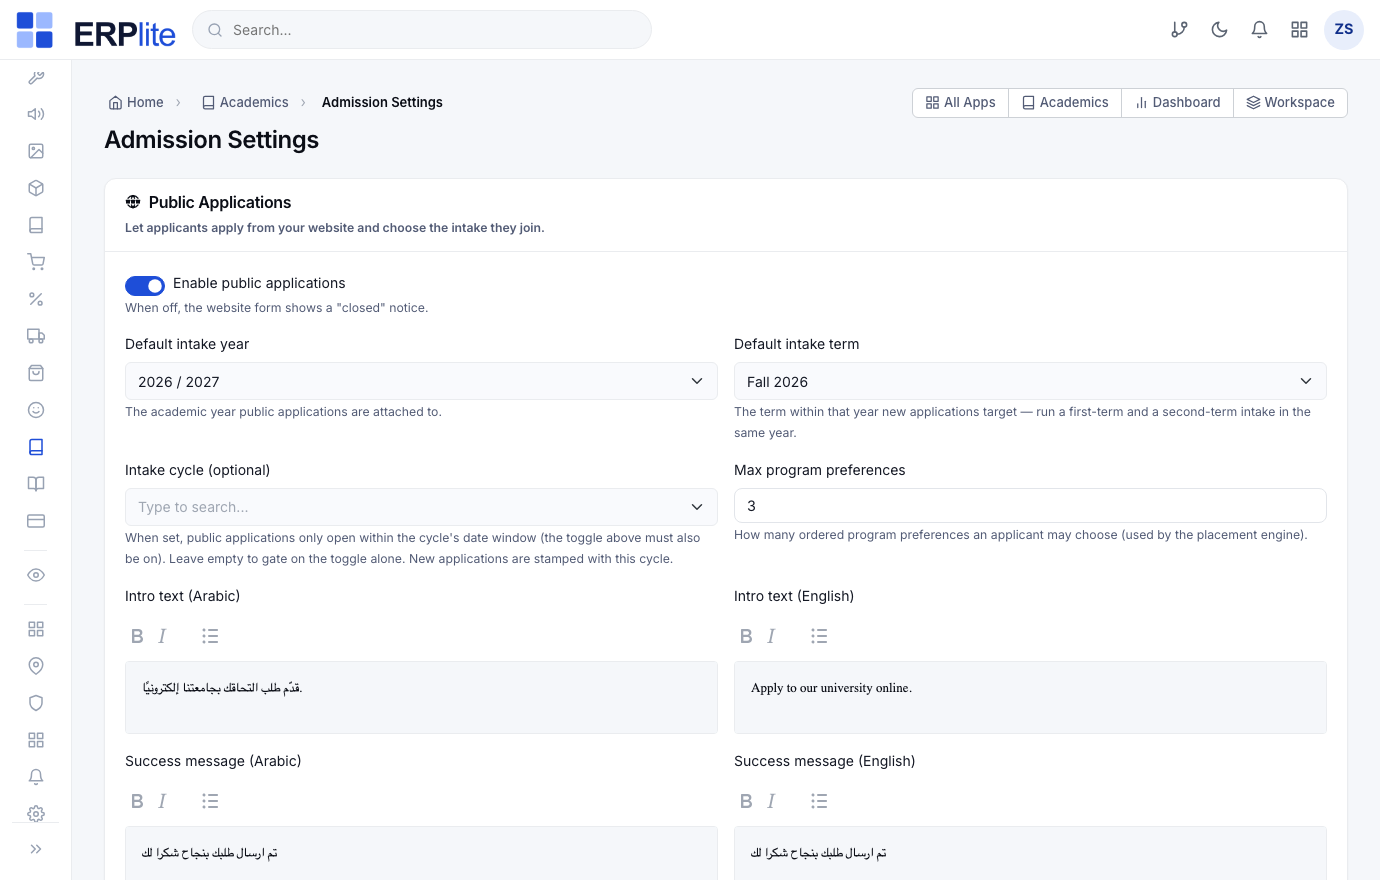
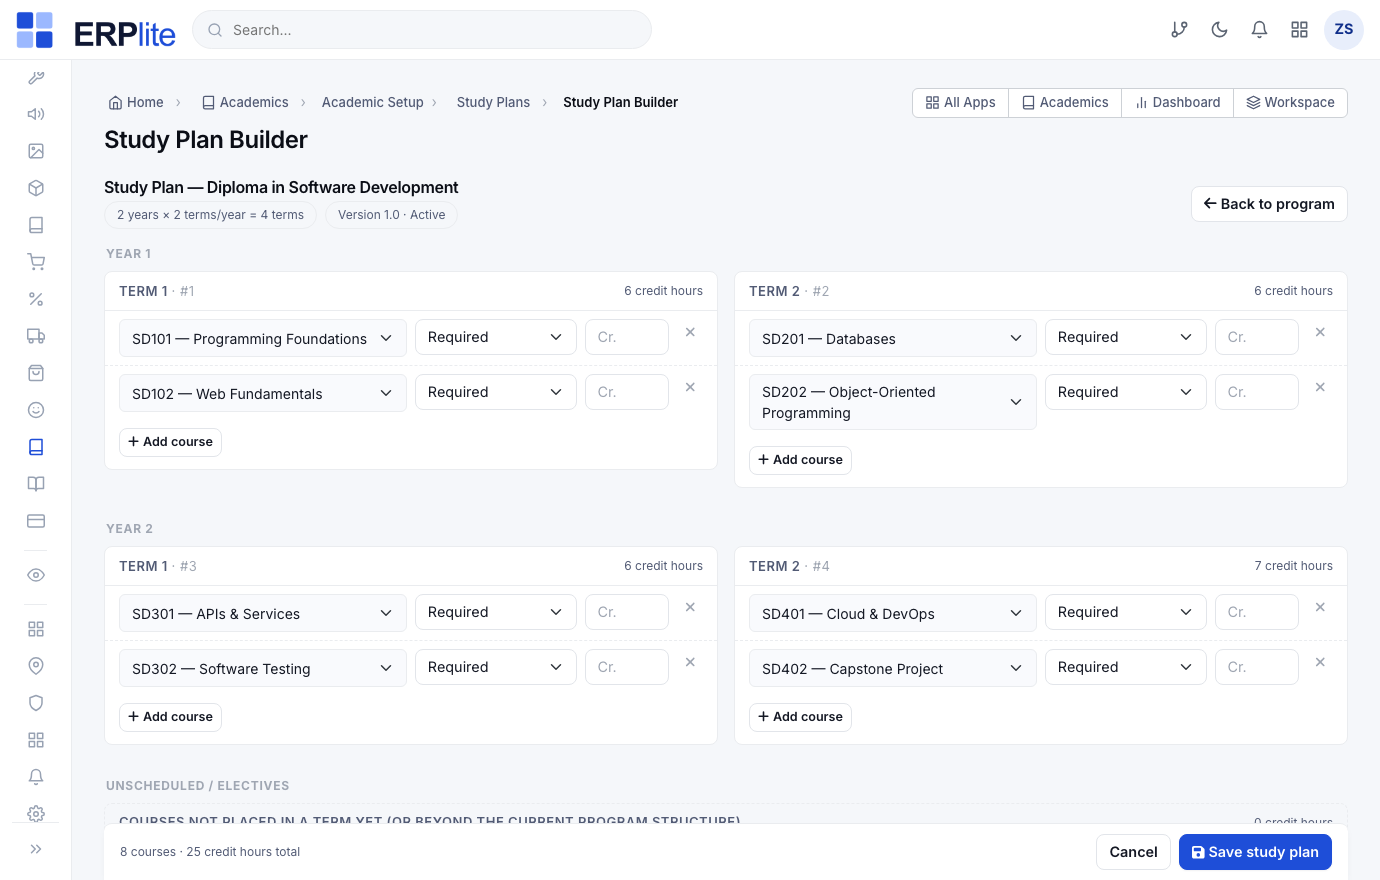
Before any cohort: the program structure & the study-plan builder
One-time setup per program — the whole cycle hangs off it:
- 1On the program set Duration (years) and Terms per year — years × terms/year is the program total terms, which drives the plan grid, the cohort term map and the installment count. Set the tuition product, tax code and the tax-exempt countries there too.
- 2Open the Study Plan Builder from the program page — /admin/study-plans/builder/{program} — a single-page grid of Year 1 Term 1 … Year N Term T. Add courses per term and press Save study plan in one submit. Each program has exactly one study plan; it appears on the program page and the public website.
Build the term
Set up the classes you will run this term — do this once per term, before enrolling anyone.
Course Sectionsشُعب المقررات
RegistrarAcademics › Course Sections/admin/course-sections
For each course this term:
1) Create one or more sections (e.g. SD101 — Section 01).
2) Set the capacity.
3) Choose the overflow policy — block, waitlist or allow — and the waitlist size.
Creates the section and its seat counter. Publishing a section automatically creates its LMS course space — no manual setup in the LMS.
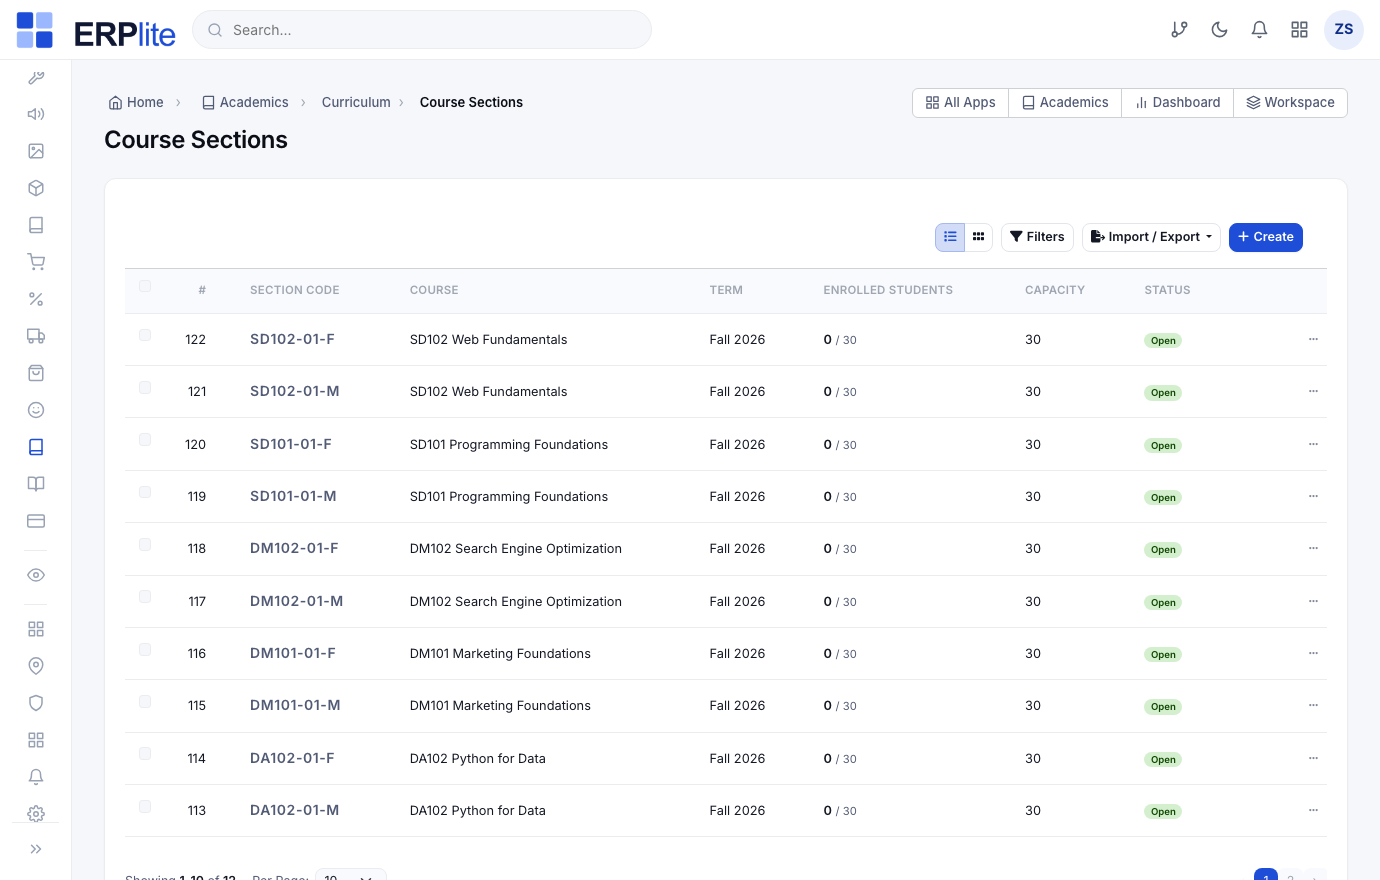
Prefer to build a whole term at once? Section Distribution (step 13) can size and create all a cohort sections for a term in one pass.
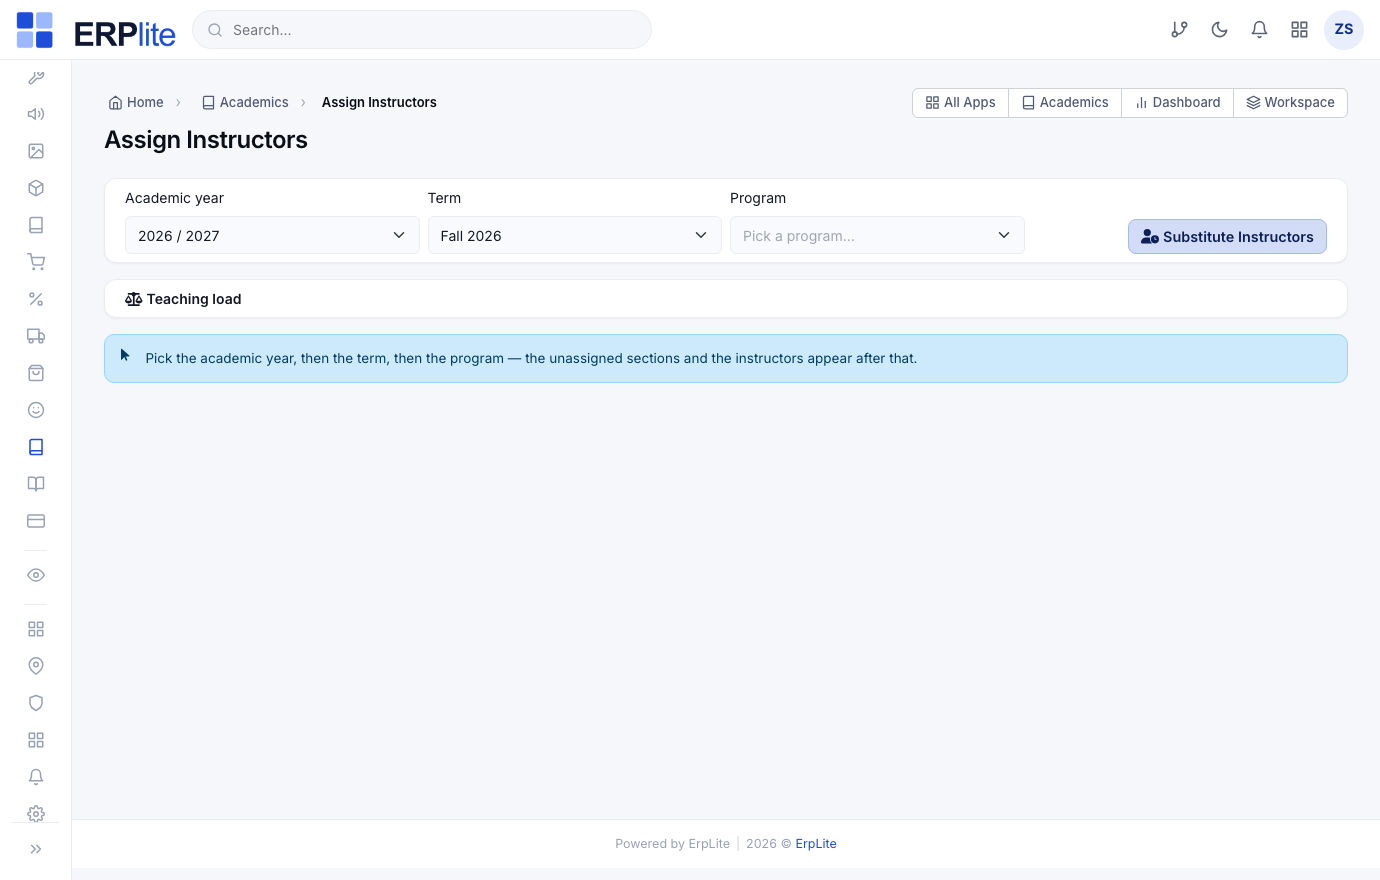
Instructors & the assignment workspaceأعضاء هيئة التدريس · إسناد أعضاء هيئة التدريس
RegistrarAcademics › Instructors · Assign Instructors · Substitute Instructors/admin/instructors · /admin/section-assignment
1) Create instructors directly (full user form + the courses they can teach).
2) Open Assign Instructors: it lists every course whose sections still lack an instructor, and suggests linked instructors first — each with a live teaching load in a sticky bar for fair assignment.
3) Assign an instructor and set lecture days & times in the same step.
4) For a one-day replacement, add a Substitute with the exact date.
Creates the class schedule (rejecting instructor/room clashes) — it appears instantly in the student and instructor portals with a per-term switcher and a printable PDF. Substitutes replace the regular instructor on that exact date only.
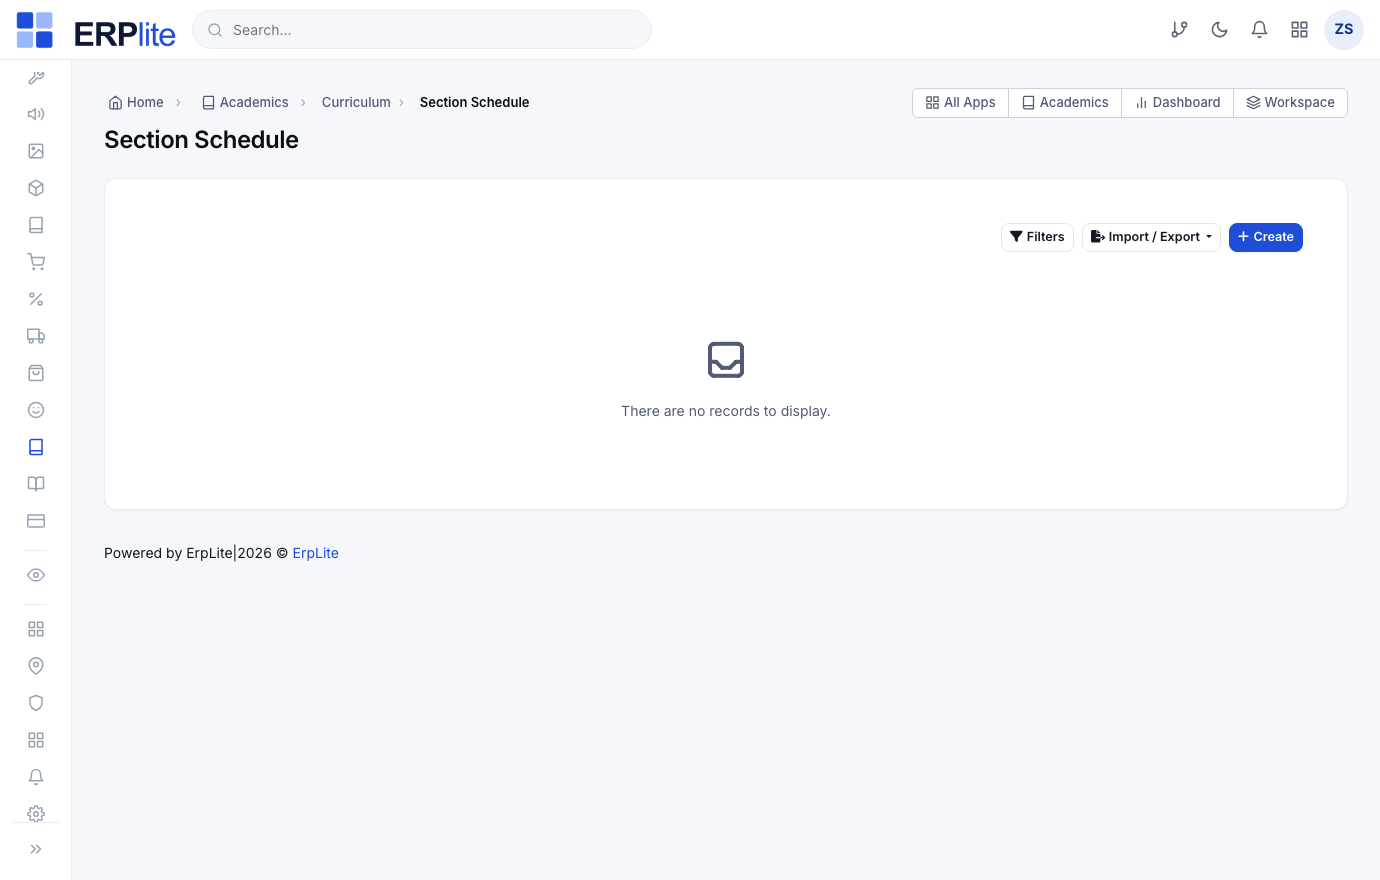
Section Scheduleجدول الشُعب
RegistrarAcademics › Section Schedule/admin/section-schedules
Add meeting times per section (e.g. Sun/Tue 10:00–11:30). Add several meetings for multi-day patterns.
Builds the timetable and uses it for clash detection and for students browsing open sections.
Enroll students into classes
Three ways to do this — pick whichever fits. They all respect the registration window, prerequisites and seat limits.
Three ways to enroll
StaffOne by one
Pick a student and a section on the Enrollments page. Best for exceptions and late adds.
StaffWhole cohort
Use Section Distribution to size, create and fill a cohort sections for a term in one pass.
StudentStudent self-registration
If you enable section self-selection, students enroll themselves from their portal — prerequisites and capacity are checked automatically.
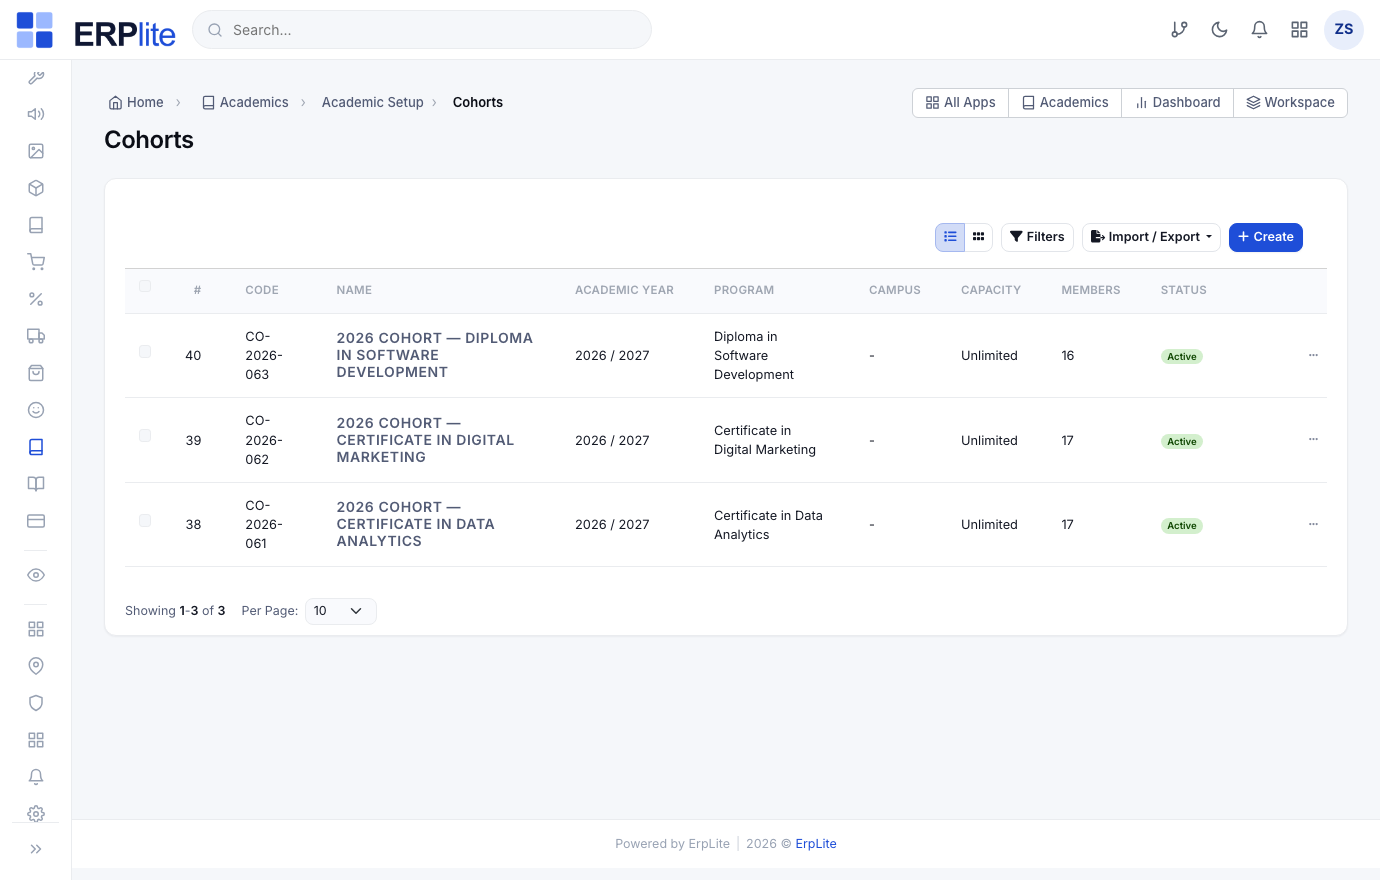
Cohortsالدفعات
OptionalAcademics › Cohorts/admin/cohorts
Group students into an intake batch, add members, and mark one primary cohort each. Cohorts drive Section Distribution.
Tracks membership and capacity. Most cohorts are created for you by Cohort Placement at conversion — you only come here to view or adjust them.
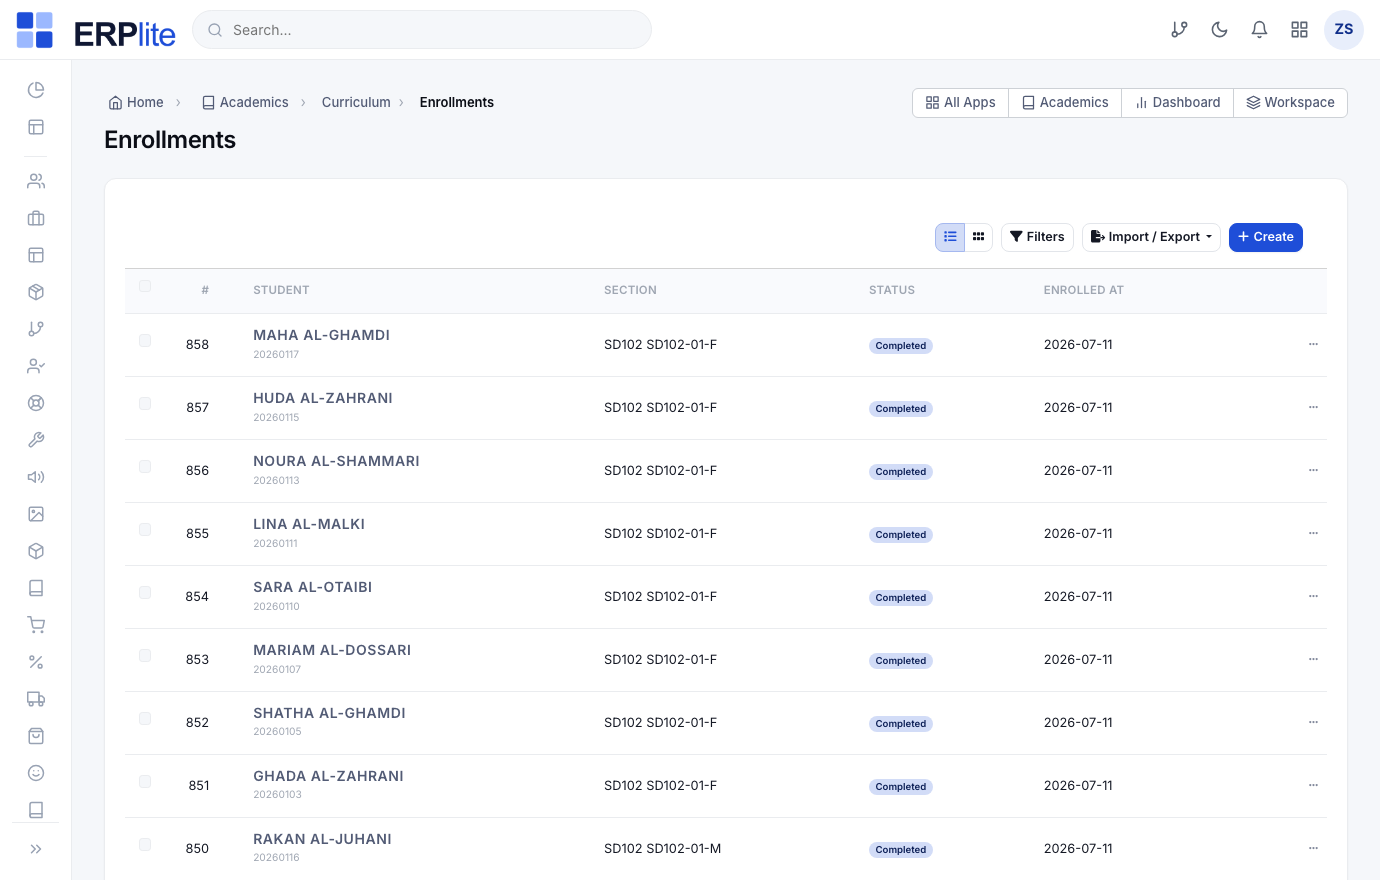
Enrollmentsالتسجيلات
RegistrarAcademics › Enrollments/admin/enrollments
Add a student to a section. If the section is full and its policy is waitlist, the student is queued instead.
Takes a seat (or a waitlist spot). When someone withdraws, the next waitlisted student is promoted automatically, which also provisions their LMS access.
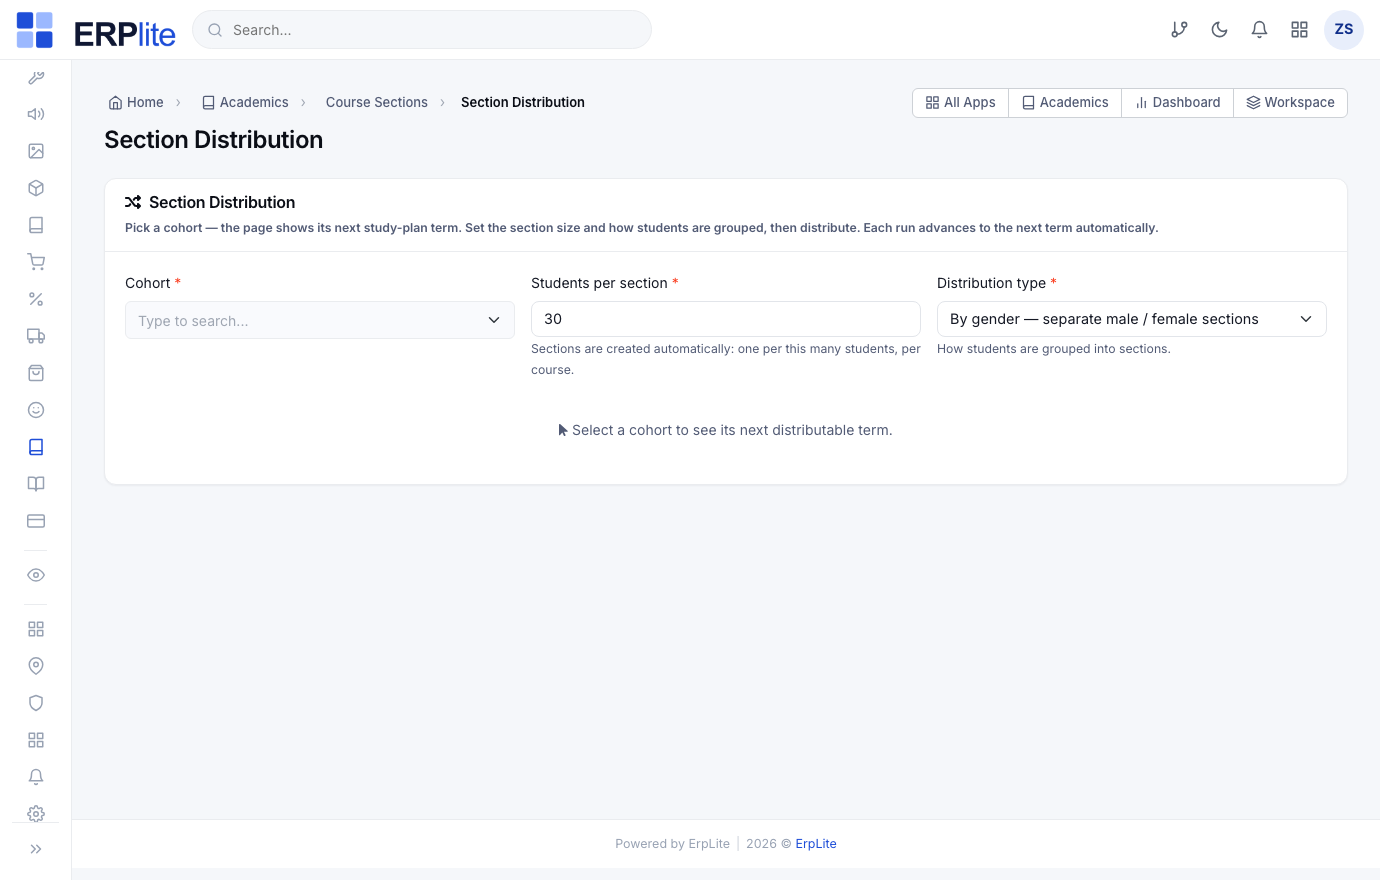
Section Distributionتوزيع الشُعب
RegistrarAcademics › Section Distribution/admin/section-distribution
1) Pick a cohort — the page shows its next plan term automatically (term 1 first; each run advances to the next).
2) Set the number of students per section.
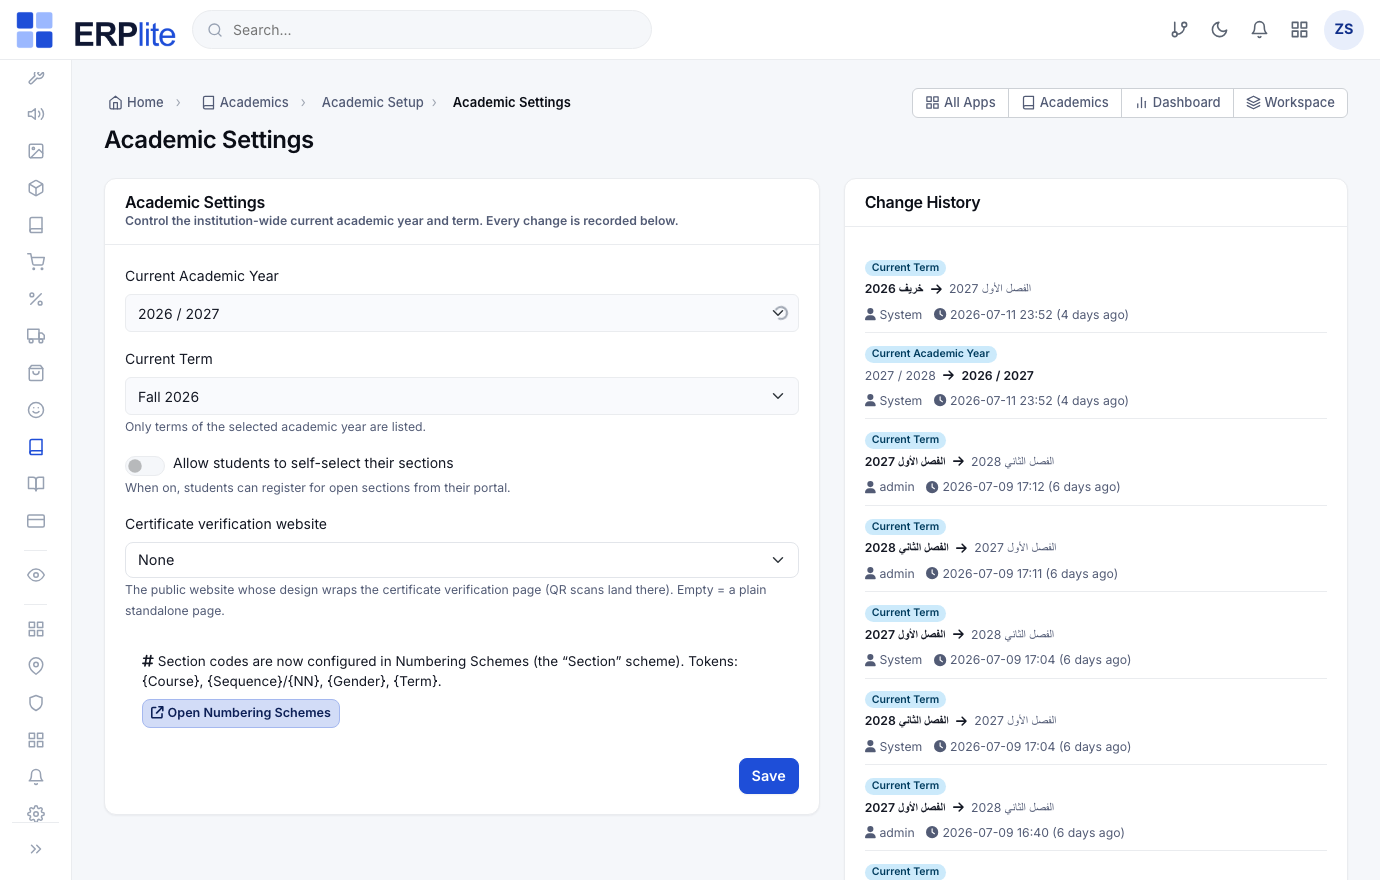
3) Choose how to group them: by gender (strictly separate male/female sections), or alphabetically by Arabic or English name.
4) Press Distribute.
Creates the sections (named by your section naming pattern in Academic Settings) and every enrollment in one pass, then saves the run in the distribution history. A finished term can never be re-distributed. Afterwards you can transfer a student between sections in one step (blocked once grades or attendance exist).
Collect the installments
Tuition runs on one engine — Sales + Accounting — starting from the order Cohort Placement created. Billing is invoice-on-payment: each installment raises its own posted invoice the moment it is paid, so nothing sits as an open receivable for future terms.
Student Finance is a set of views over the tuition engine
There is one place tuition money lives (Accounting/Sales). Student Finance gives you finance-shaped windows onto it: Tuition Orders, Tuition Installments, Withdrawal Requests, and reports — plus setup: Fee Structures, Scholarships, Refund Policies.
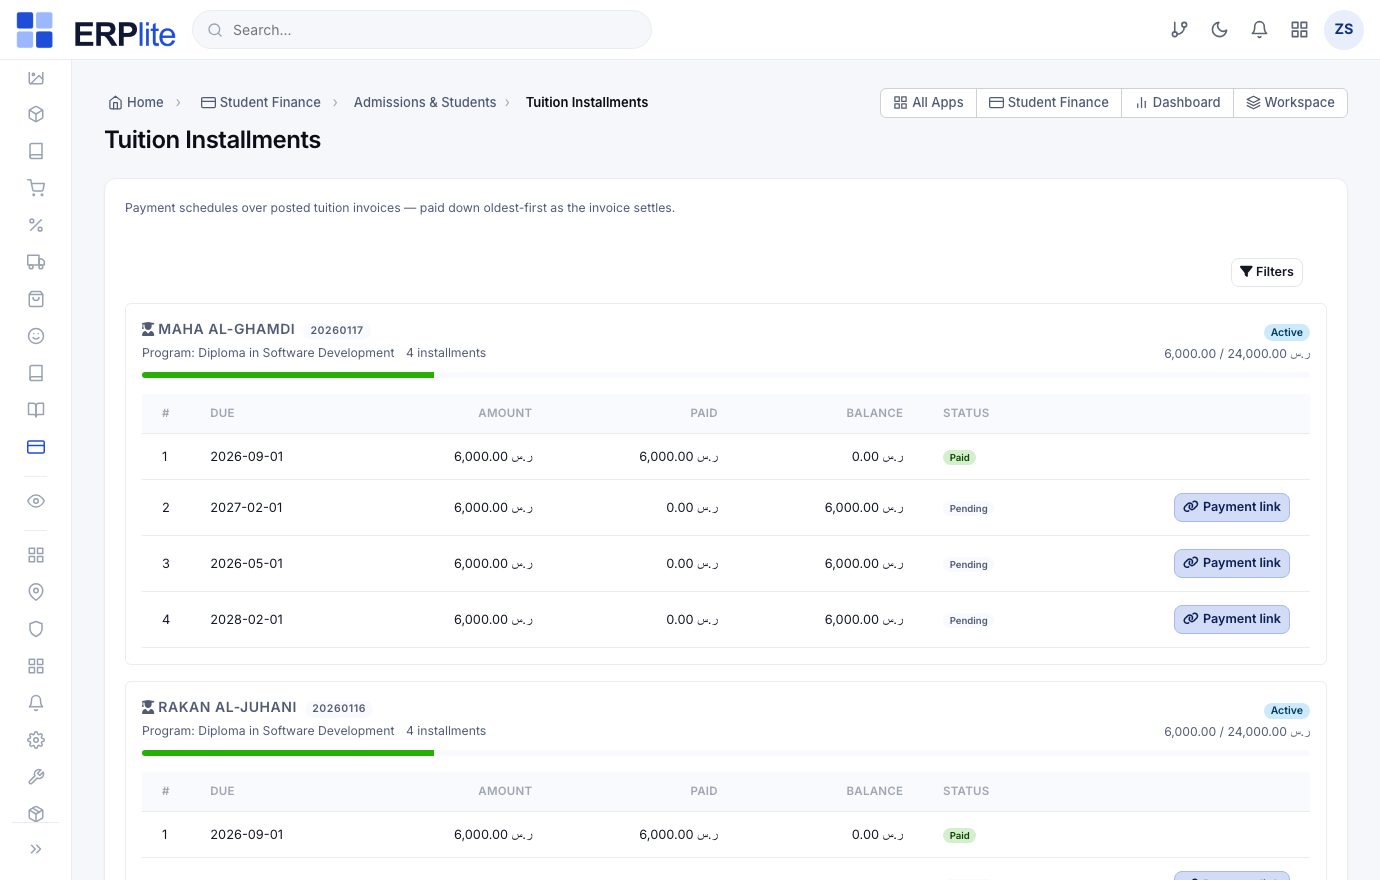
Tuition order & installment scheduleطلبات الرسوم الدراسية · أقساط الرسوم الدراسية
AutomaticStudent Finance › Tuition Orders · Tuition Installments/admin/tuition-orders · /admin/tuition-installments
Cohort Placement created a confirmed tuition order per student. With the per-term payment type it is an installment-billing order: one installment per program term, due on each mapped term start date, tax split so the slices sum to the order total to the cent. Installment 1 is already paid — settled by the held registration fee. With the full-payment type there is a single invoice instead, and no schedule.
Monitor progress here. Amount-mode orders show an installment billing badge; the quantity-based Generate invoice button is intentionally absent.
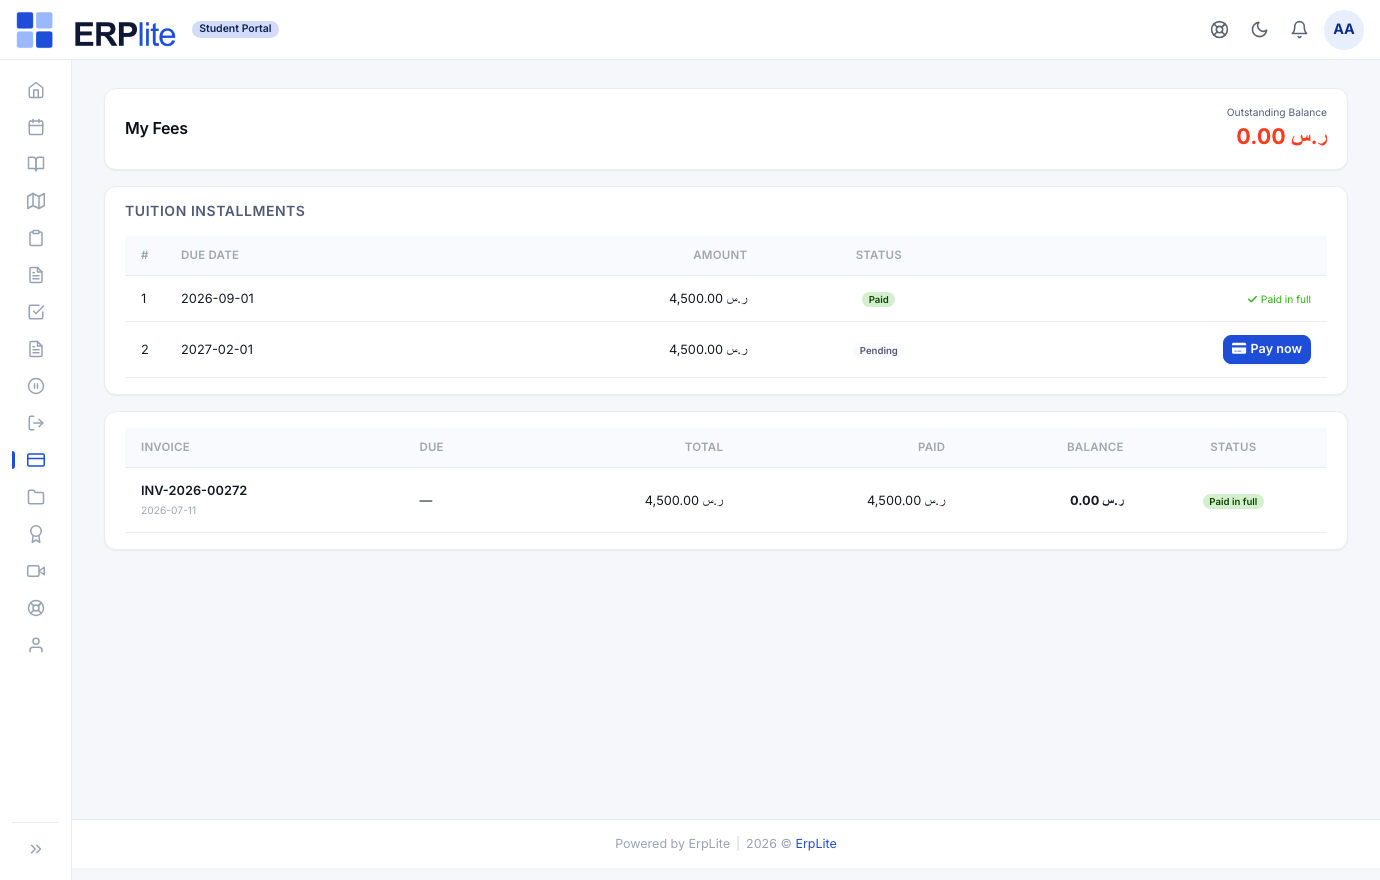
Each installment pays itself into an invoiceادفع الآن — بوابة الطالب
StudentStudent portal › My Fees · Admin: Tuition Installments/student/fees · /admin/tuition-installments
My Fees shows the full schedule — due date, amount, status per installment — with a Pay now button on every unpaid slice. The checkout shows the net + tax breakdown; exempt nationalities simply see no tax.
Generate the same hosted payment link for any installment from the admin Tuition Installments page and send it over any channel.
When the gateway confirms, it raises + posts that installment own invoice (an exact amount slice of the order), allocates the receipt against it to zero, marks the installment paid, and flips the order to done when the last slice settles.
Taxes per program are under full control: the program tuition tax code applies to everyone except nationals of its tax-exempt countries — on the order, every installment invoice, and every payment link, consistently.
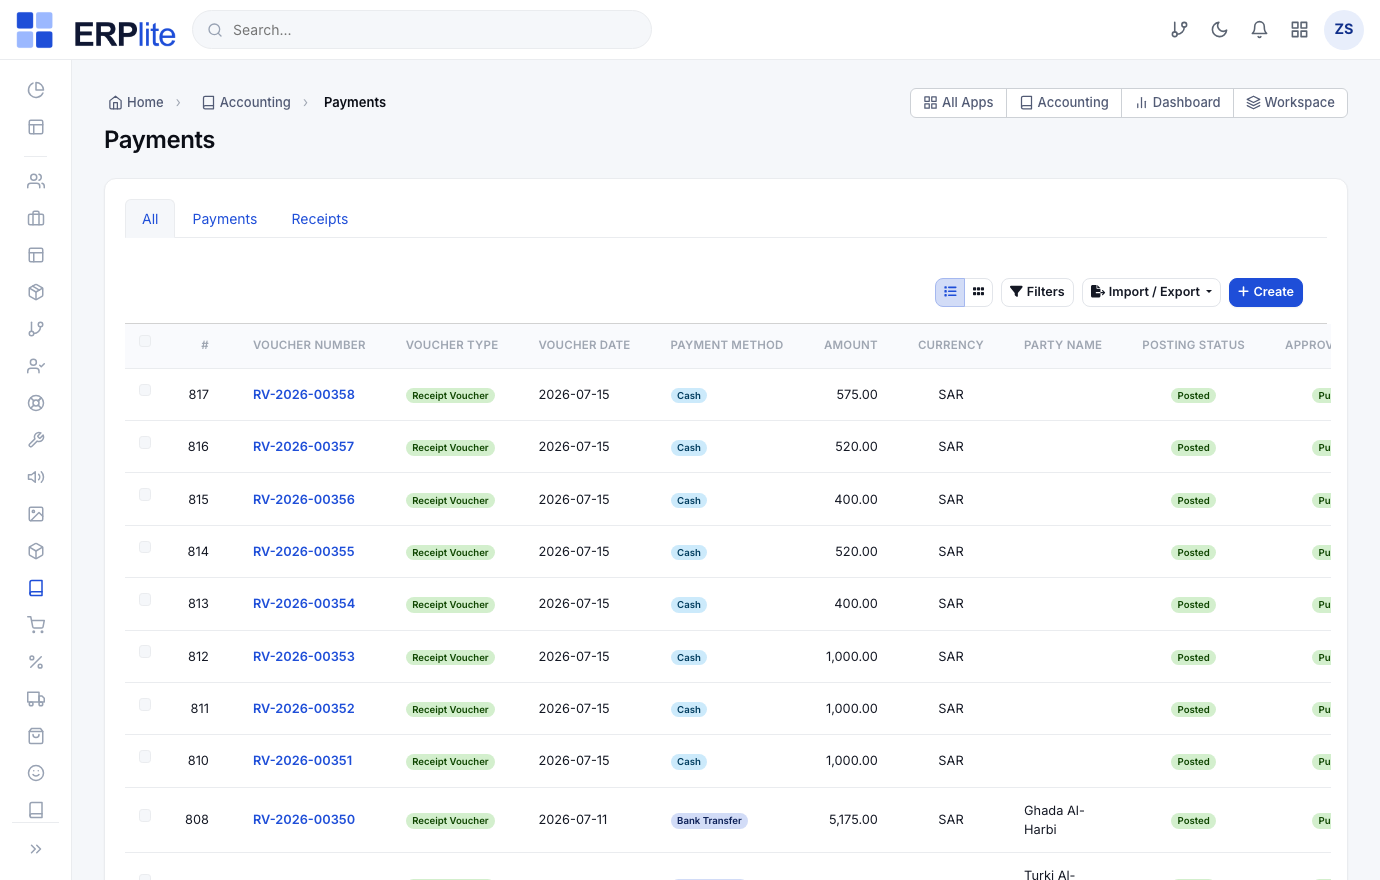
Record offline tuition paymentsالمدفوعات
FinanceAccounting › Payments/admin/payments
For bank / cash payments taken outside the gateway, record the payment and allocate it to the installment invoice (raise the slice invoice from the installment payment link first if it does not exist yet).
Reduces the invoice balance and updates the installment paid amount and status; the plan is complete once every slice is settled.
Settle the gateway to your bankتسويات بوابة الدفع
FinanceAccounting › Gateway Settlements/admin/gateway-settlements
Same as the application fees — when the processor deposits, tick the tuition receipts that deposit covered, enter the fee, Settle selected.
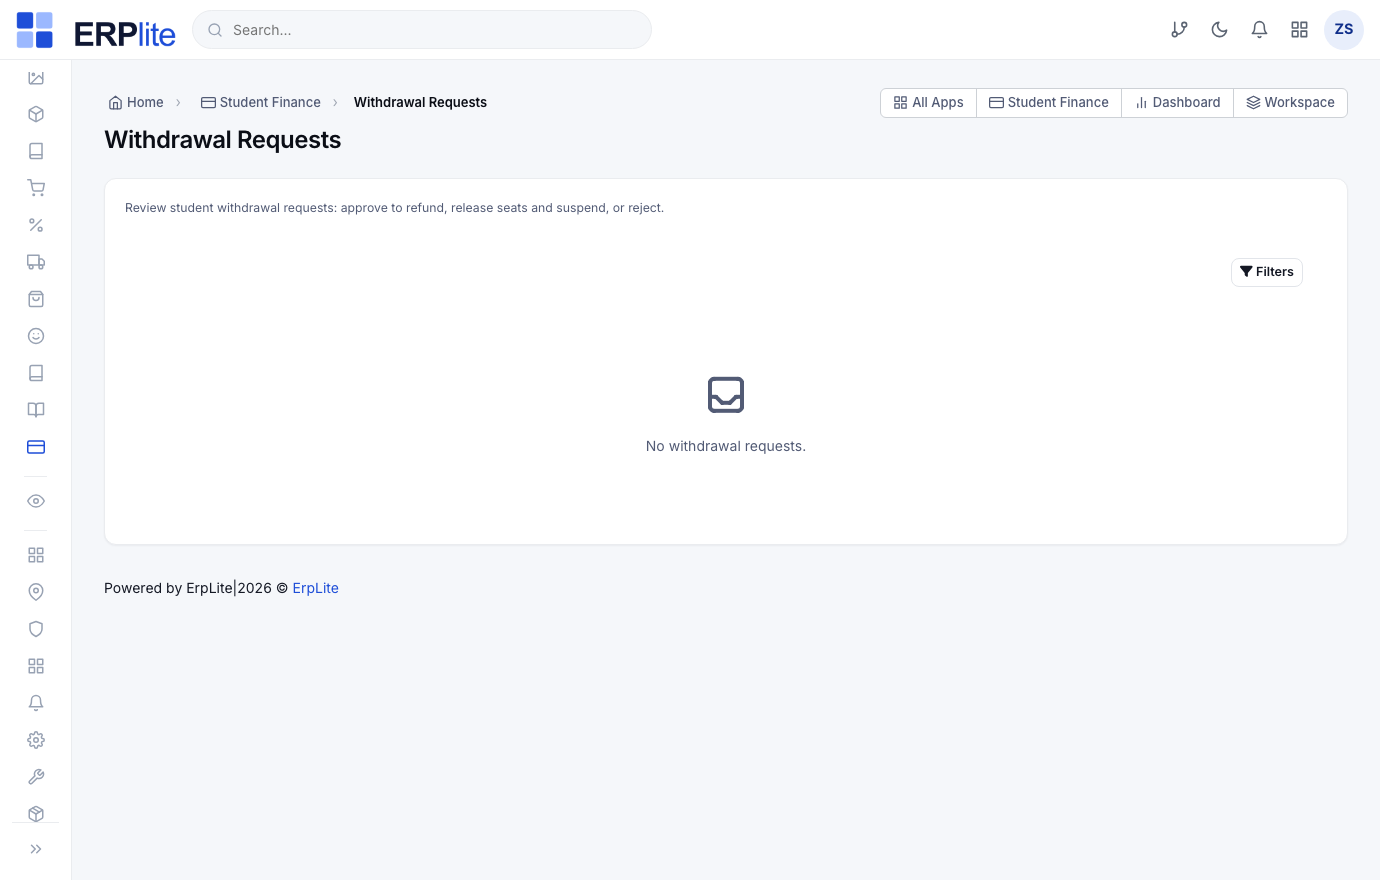
Withdrawal & refundطلبات الانسحاب
FinanceStudent Finance › Withdrawal Requests · Refund Policies/admin/student-withdrawals · /admin/refund-policies
Requests withdrawal from their portal and sees the refund amount up front before submitting.
Review the request and Approve or reject. The refund percentage comes from your tiered Refund Policy, measured from the study start date.
On approval, posts the refund (auto gateway refund when possible, else a credit note), releases the student seats, and sets the student to withdrawn.
Teach & assess the term
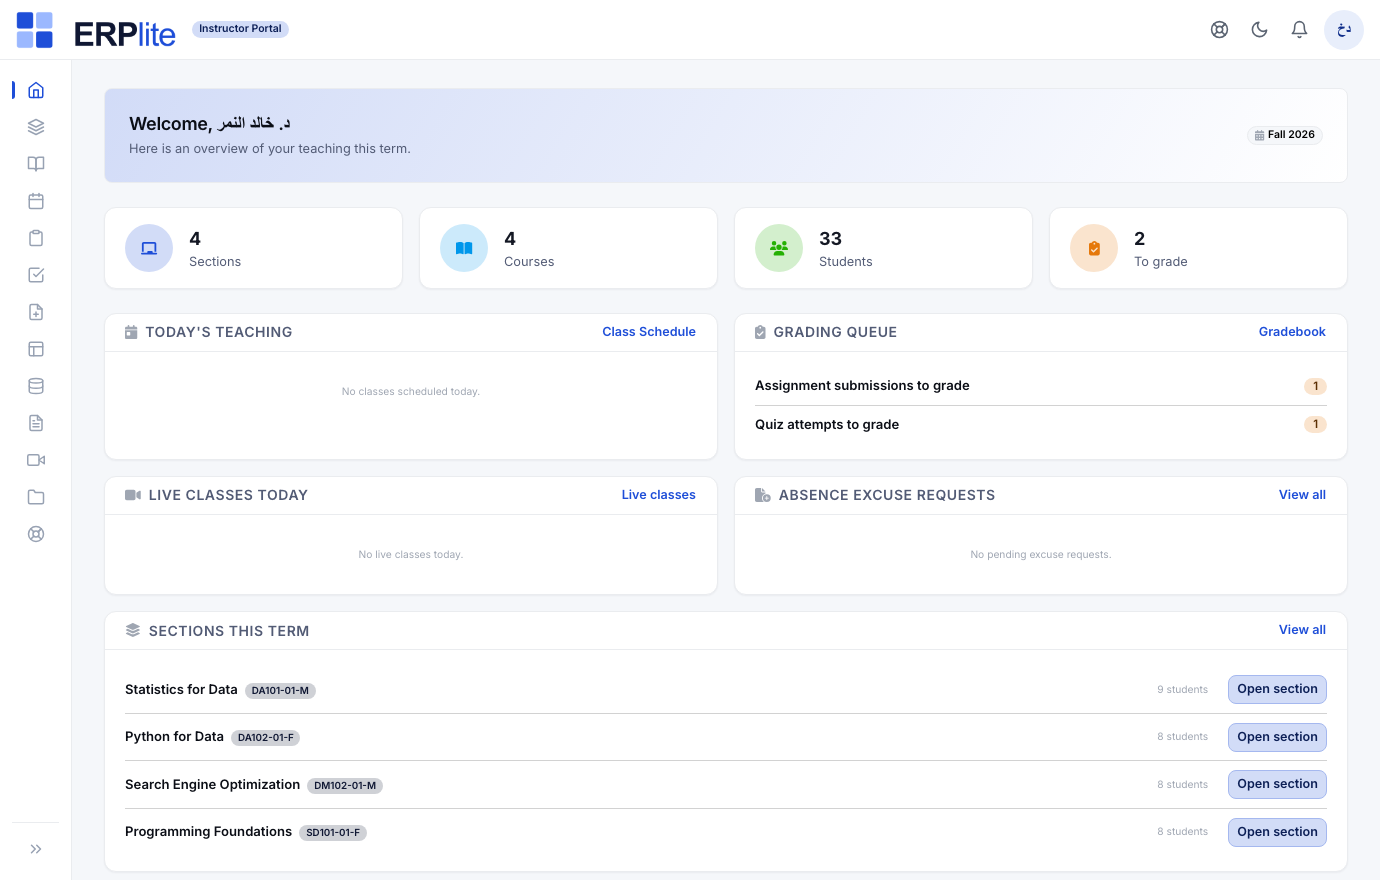
Instructors run their classes from the Instructor Portal — their own branded login, separate from the admin dashboard. The LMS course space already exists from the moment the section was published.
The Instructor Portal
Instructors sign in at /instructor and see only their sections for the current term (with a switcher for past terms — future terms stay hidden). From each section they reach the roster, attendance and grade entry. Teaching no longer lives in the admin dashboard.
Build the course space
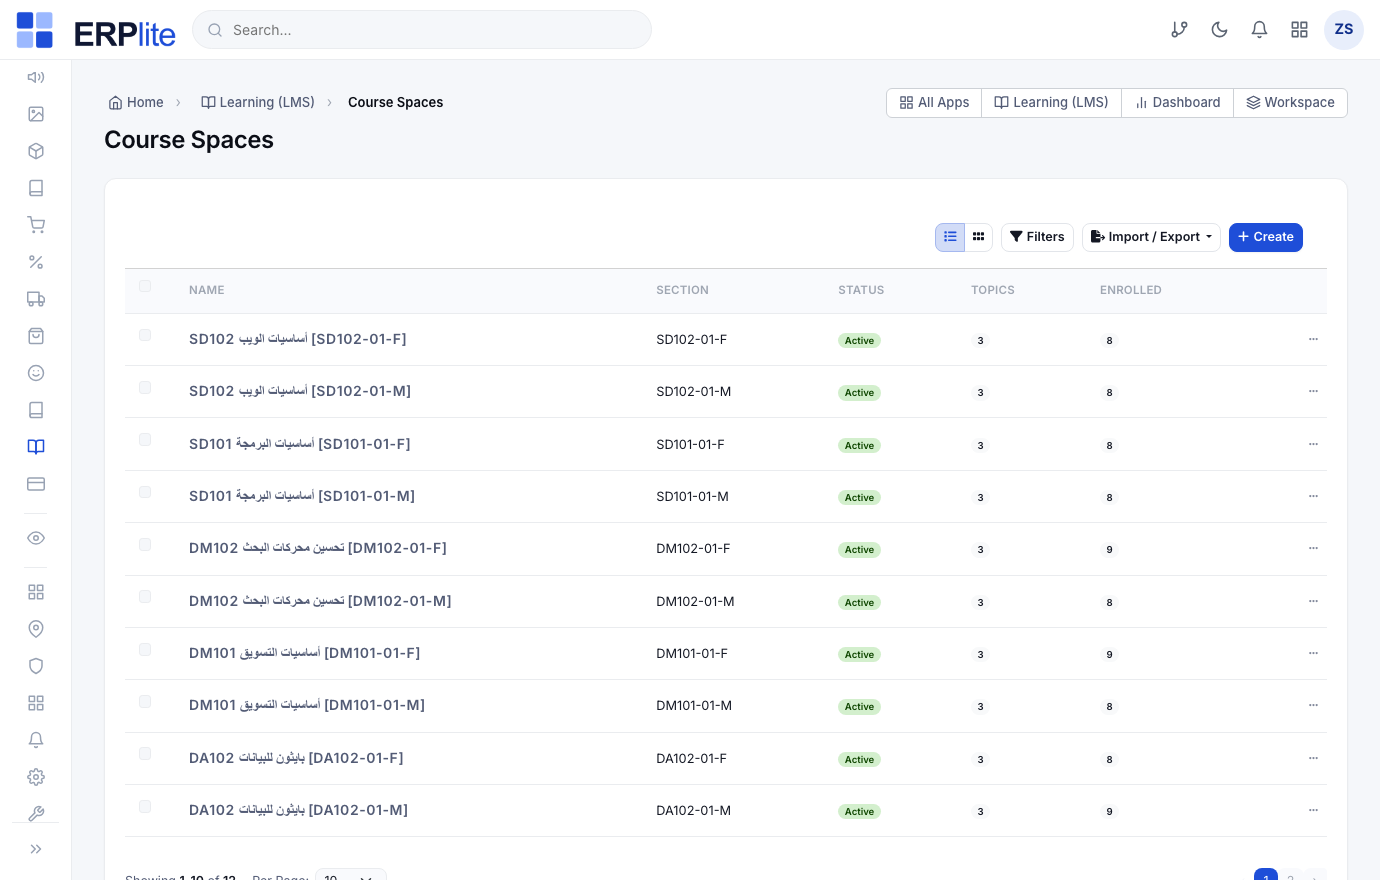
InstructorLMS › Courses, Assignments, Quizzes, Live Classes
Add modules and lessons (text, video, files), post announcements, set assignments and quizzes (from a reusable question bank), and schedule live classes — Zoom, Teams or Google Meet via a connected account, or a manual link.
Auto-grades multiple-choice quizzes; live-class status and recordings update on their own via the provider. Students see everything under My Learning.
Take attendanceالحضور
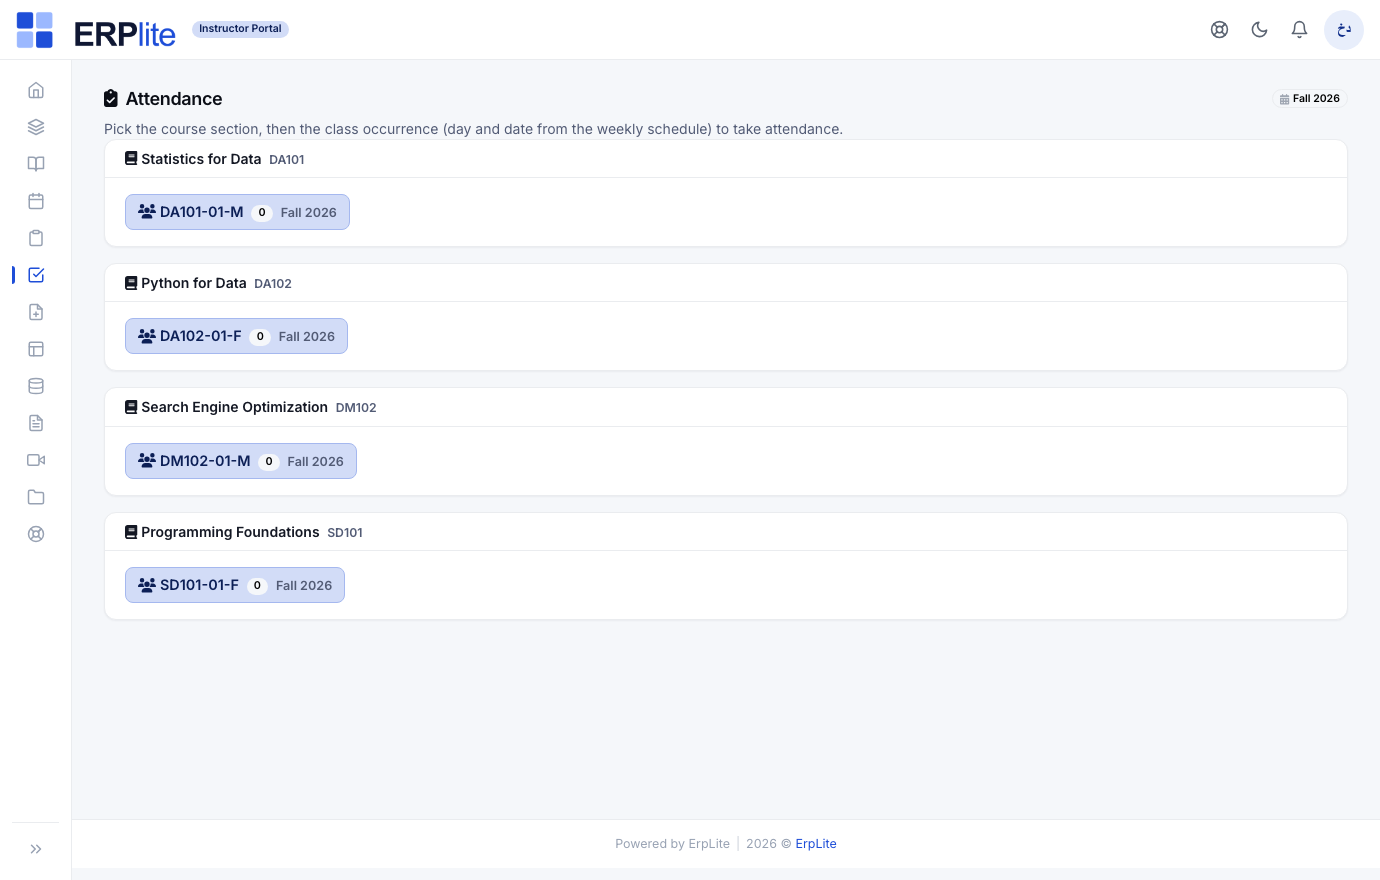
InstructorInstructor Portal › a section › Attendance/instructor
Open a session for the section meeting and mark each student present, absent, late or excused.
Loads the enrolled roster and records attendance for reporting and standing.
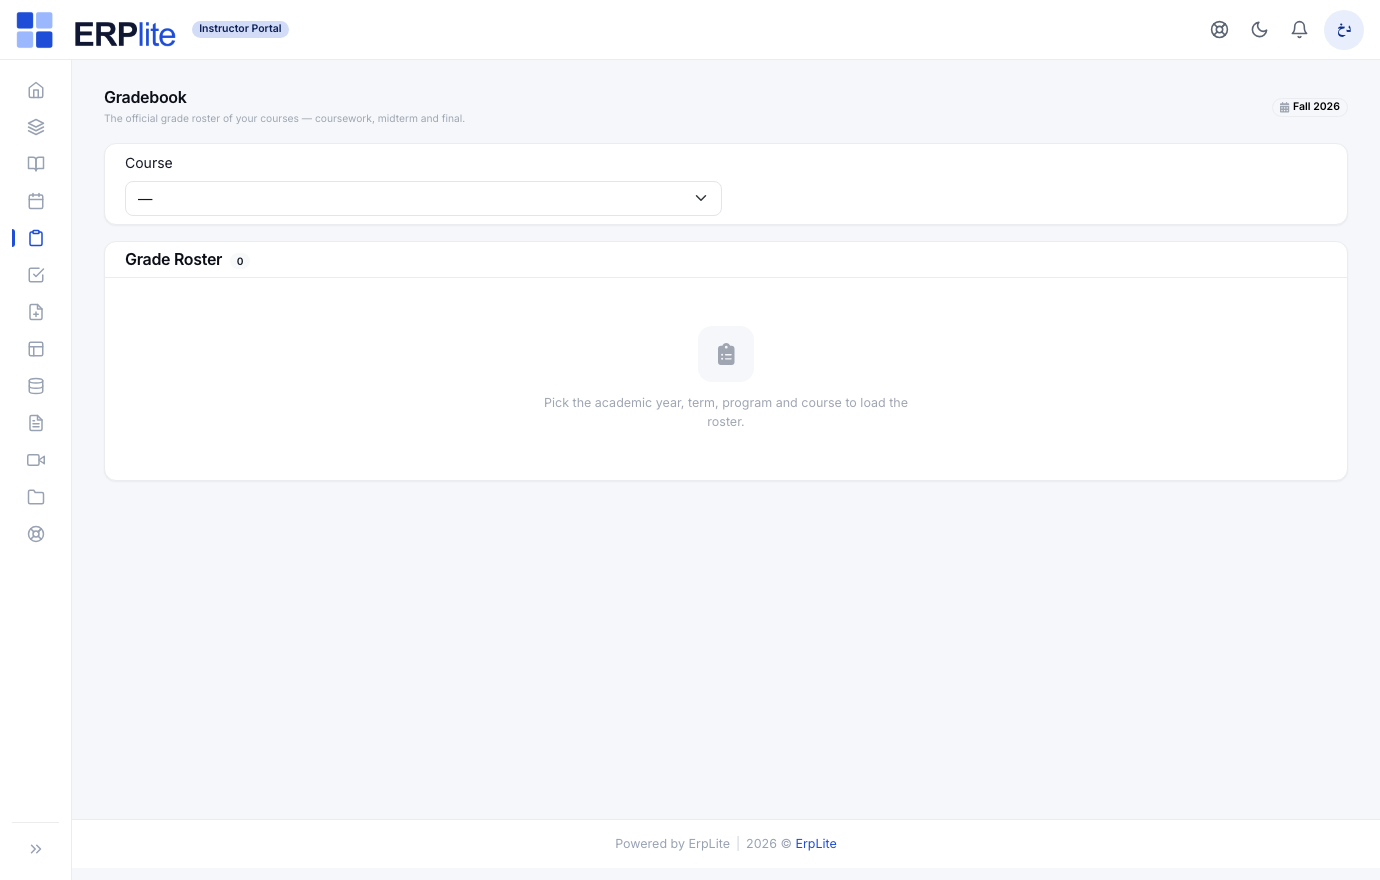
Enter grades & finalizeدفتر درجات المقررات
InstructorInstructor Portal › a section › Grades/instructor
Enter scores for each component — coursework (أعمال السنة), midterm (الميدترم) and final (النهائي), each with a max score and weight — then press Finalize & publish grades for the section.
Converts weighted scores into final letter grades using the grade scale and posts each result back to the student academic record — feeding the transcript and GPA. No re-typing into the SIS.
Results & graduation
Grades roll up into transcripts and GPA; when requirements are met, the student graduates.
Students & transcriptsالطلاب · السجلّ الأكاديمي
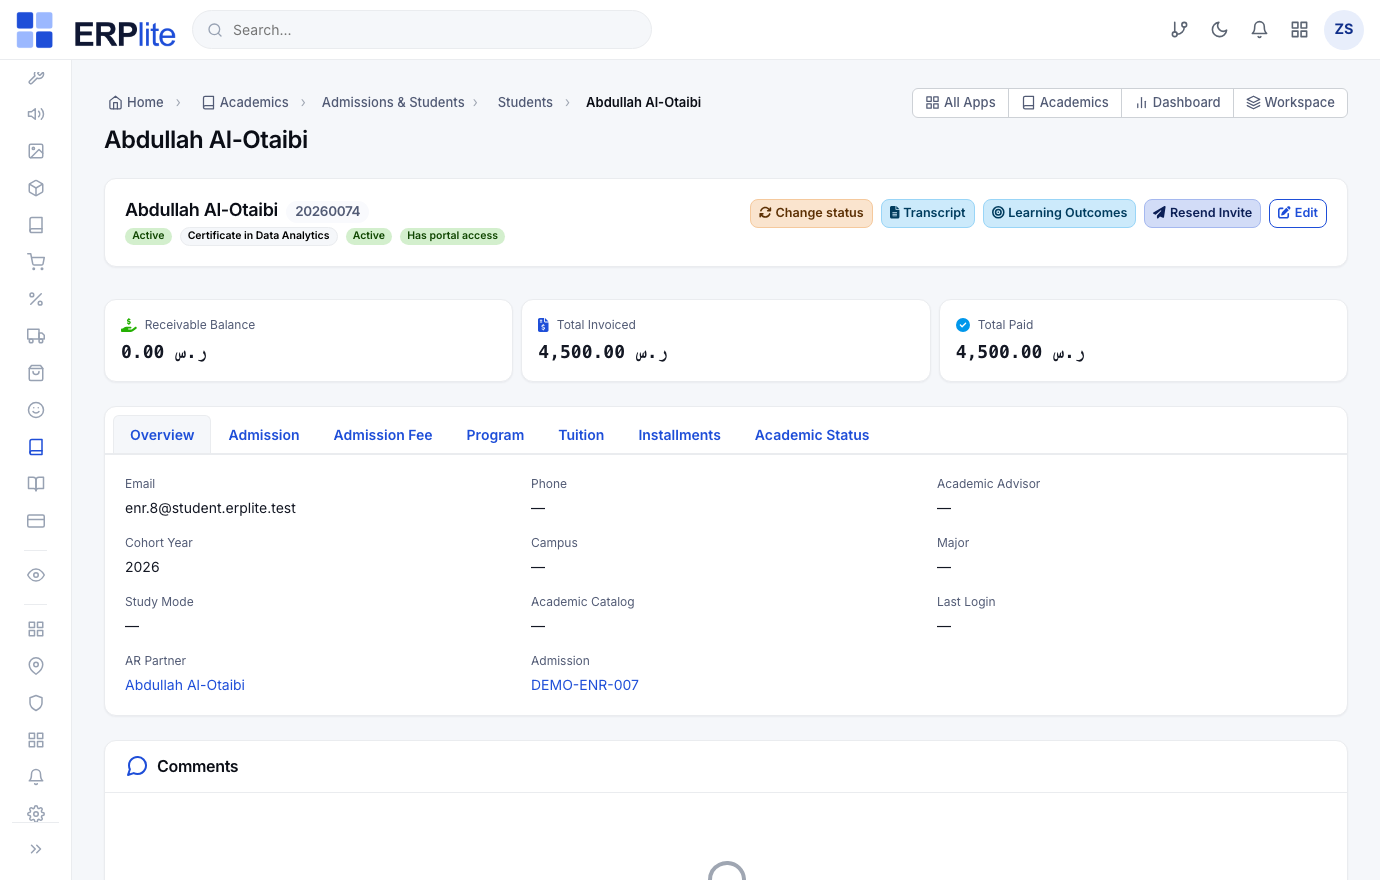
ViewAcademics › Students › the student 360 page/admin/students
Open any student for the 360° record. The header carries a Transcript button and shows their live badges (status, program, portal access) and money at a glance — receivable balance, total invoiced, total paid. Tabs walk Overview · Admission · Admission Fee · Program · Tuition · Installments · Academic Status. The transcript itself lists completed courses, credits, letter grades, term GPA and cumulative GPA, and progress against the study plan. Students see the same in their portal.
Design the certificate templateقوالب الشهادات
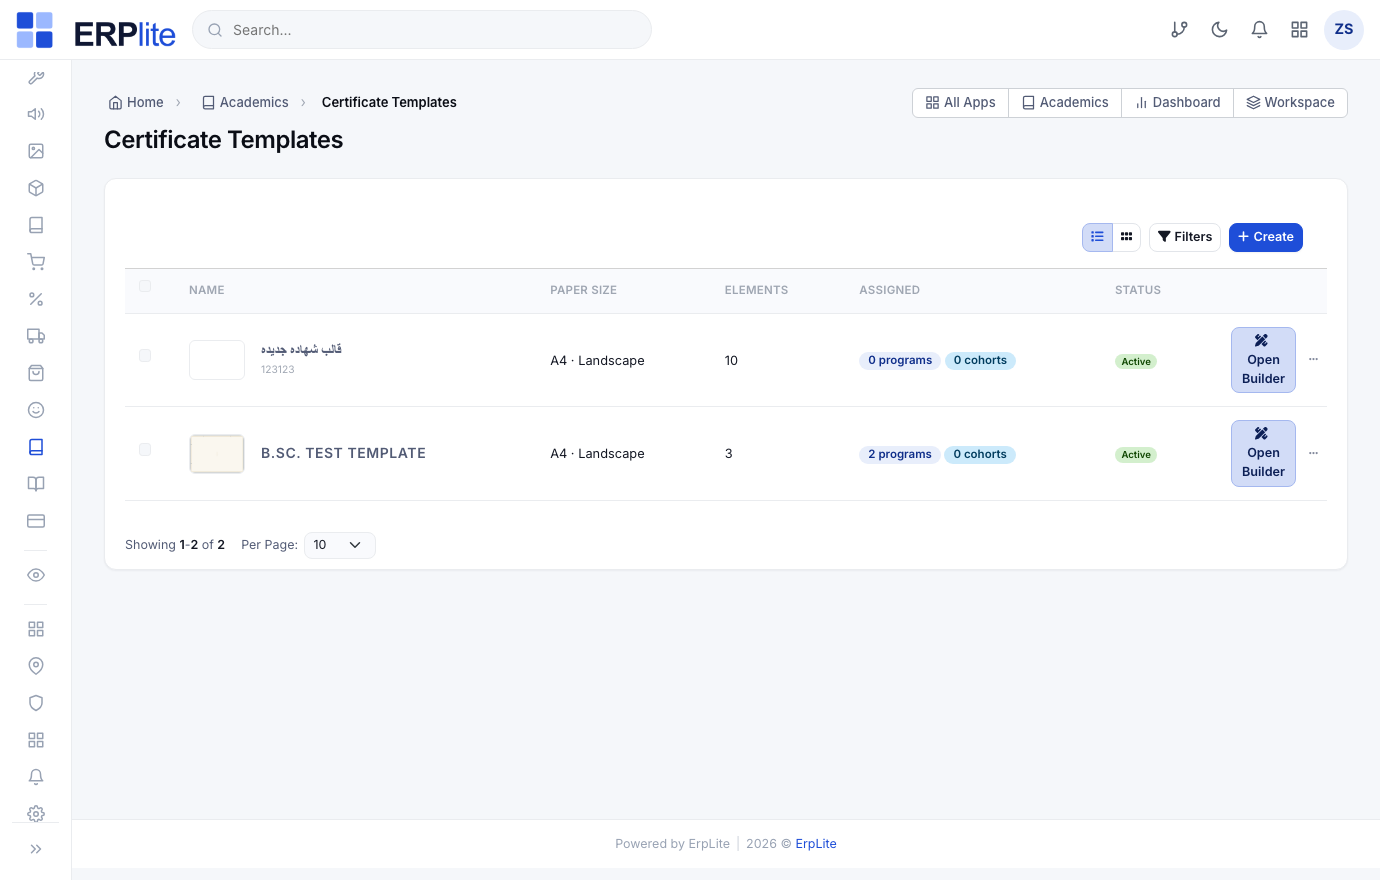
AdminAcademics › Certificate Templates/admin/certificate-templates
One-time design per certificate — before anyone can graduate:
1) Press Create, name the template and pick the paper size & orientation (e.g. A4 · Landscape).
2) Press Open Builder to open the drag-and-drop layout designer.
3) Drop dynamic fields onto the page — student name (Arabic & English), academic number, program, cohort, major, campus, graduation date, certificate number and a verification QR — plus your own text, logos and images.
4) Press Preview PDF to proof it with sample data, then Save Layout.
5) Set the template Active and assign it to the programs (or cohorts) that should use it.
Stores the layout and, at issue time, renders it to a pixel-accurate PDF with every dynamic field filled from the graduate’s record. The list shows each template’s paper size, element count, what it is assigned to, and its status. A program uses its assigned template — and issuing is blocked until the student’s program has an active one.
Inside the Layout Builder
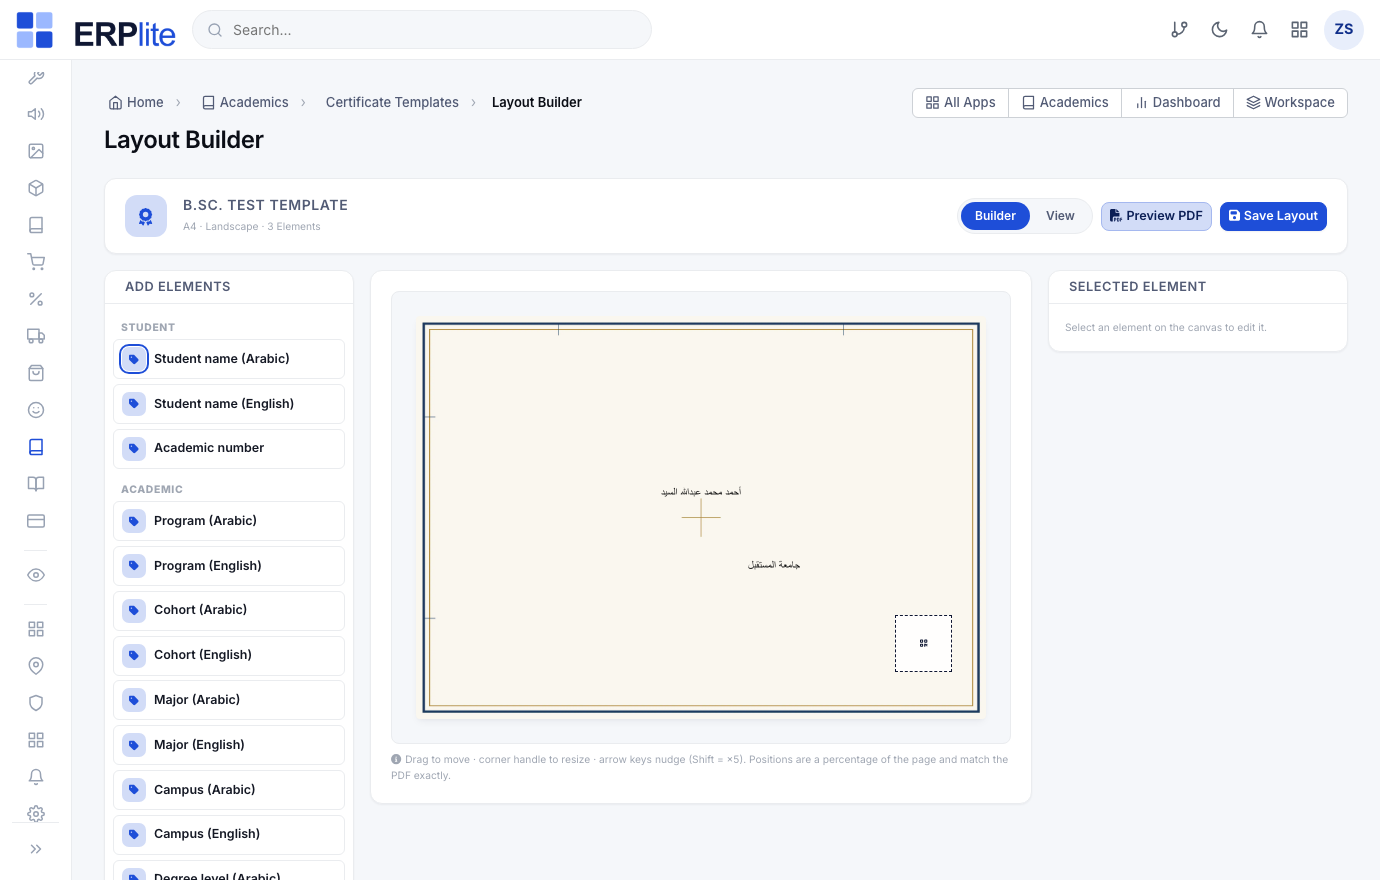
The builder is a true WYSIWYG A4 canvas — what you place is exactly what prints:
- 1An Add Elements palette lists every dynamic field — student name (AR/EN), academic number, program, cohort, major, campus, degree level, dates, certificate number and QR. Drag any onto the page.
- 2Move, resize and align each element on the real page; set its font, size and color so Arabic and English both sit correctly on the same certificate.
- 3Preview PDF renders the live template with sample data; Save Layout stores it. The element count on the templates list is exactly what you placed here.
Issue graduation certificatesإصدار الشهادات
RegistrarAcademics › Certificates › Issue/admin/certificates/issue
Graduation is issued by staff — the student never applies for it.
1) Open Certificates › Issue. The Eligible Students tab lists everyone whose study plan is COMPLETED.
2) Each row is validated again live: a fully-settled tuition ledger and an assigned certificate template are required.
3) Select the students and press Issue.
Re-checks eligibility, then creates one live certificate per student with its number and a frozen snapshot. Issued certificates enter the review cycle (Workflow templates & rules); the student is graduated (متخرّج), stamped with a graduation date, and notified only when the certificate is approved and published. With no review rule, it publishes immediately.
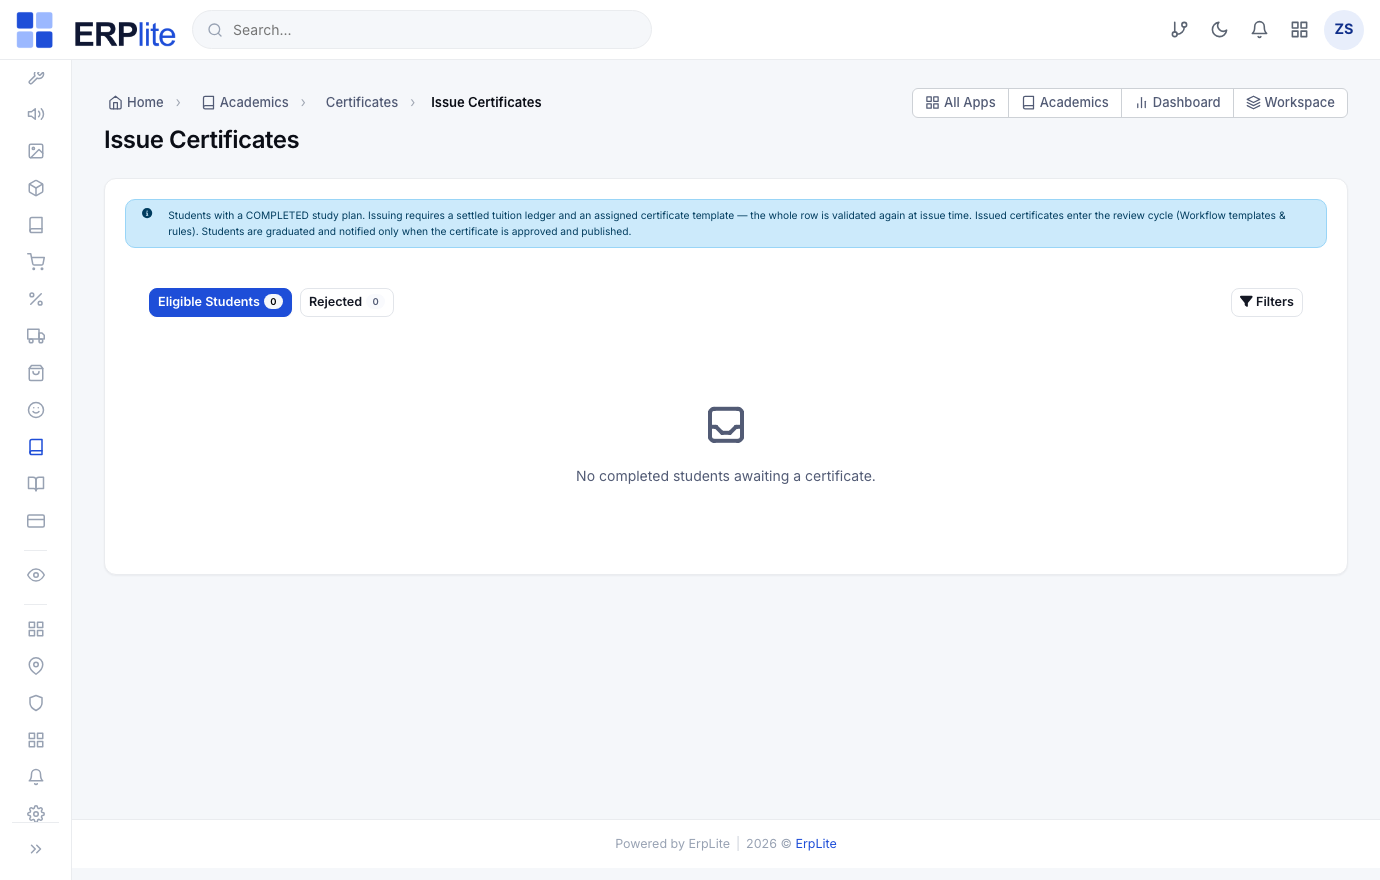
There is no “apply for graduation” screen and no transfer-credits step. A student graduates the moment their approved certificate is published — straight from a completed study plan and a cleared balance.
The certificate register & the student’s copyالشهادات · بوابة الطالب › الشهادات
AutomaticAcademics › Certificates · Student portal › Certificates/admin/certificates · /student/certificates
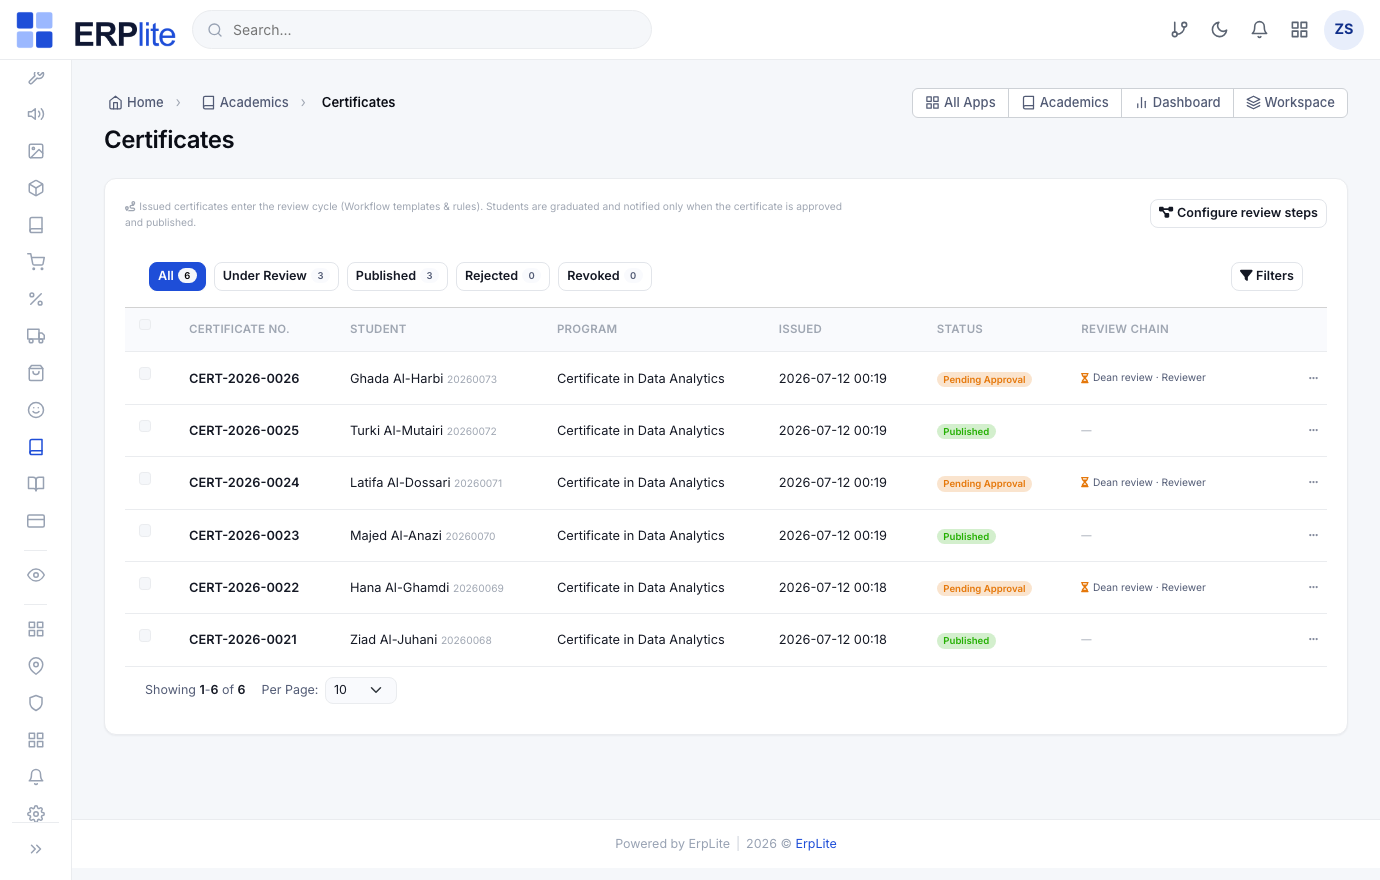
Every issued certificate lands in the register with its status — in review, published, rejected or revoked. From here reviewers approve, reject, revoke or re-issue. A published certificate exposes a downloadable PDF and a QR code that anyone can verify on a public page — no login.
Downloads the official PDF from Certificates in their portal (/student/certificates) once it is published; the QR on it lets anyone confirm it is genuine.
Govern the student lifecycle
Two axes control every student: the academic status (continuing / excluded / deferred / withdrawn / completed / graduated) and the payment status for the current term. Only Active + paid students get full portal access.
Academic status & its historyالحالة الأكاديمية
RegistrarStudents › open a student › Change status · the Academic Status tab/admin/students
Change a student status from their page — a reason is always required. Exclusion (مفصول) is manual-only; the rest mostly flow from requests and events.
Logs every transition (when, from → to, reason, source, who) in the Academic Status tab. Completed is set when the transcript covers the whole study plan; Graduated when the certificate is issued; Withdrawn / Deferred when their requests are approved.
Deferral requestsطلبات التأجيل
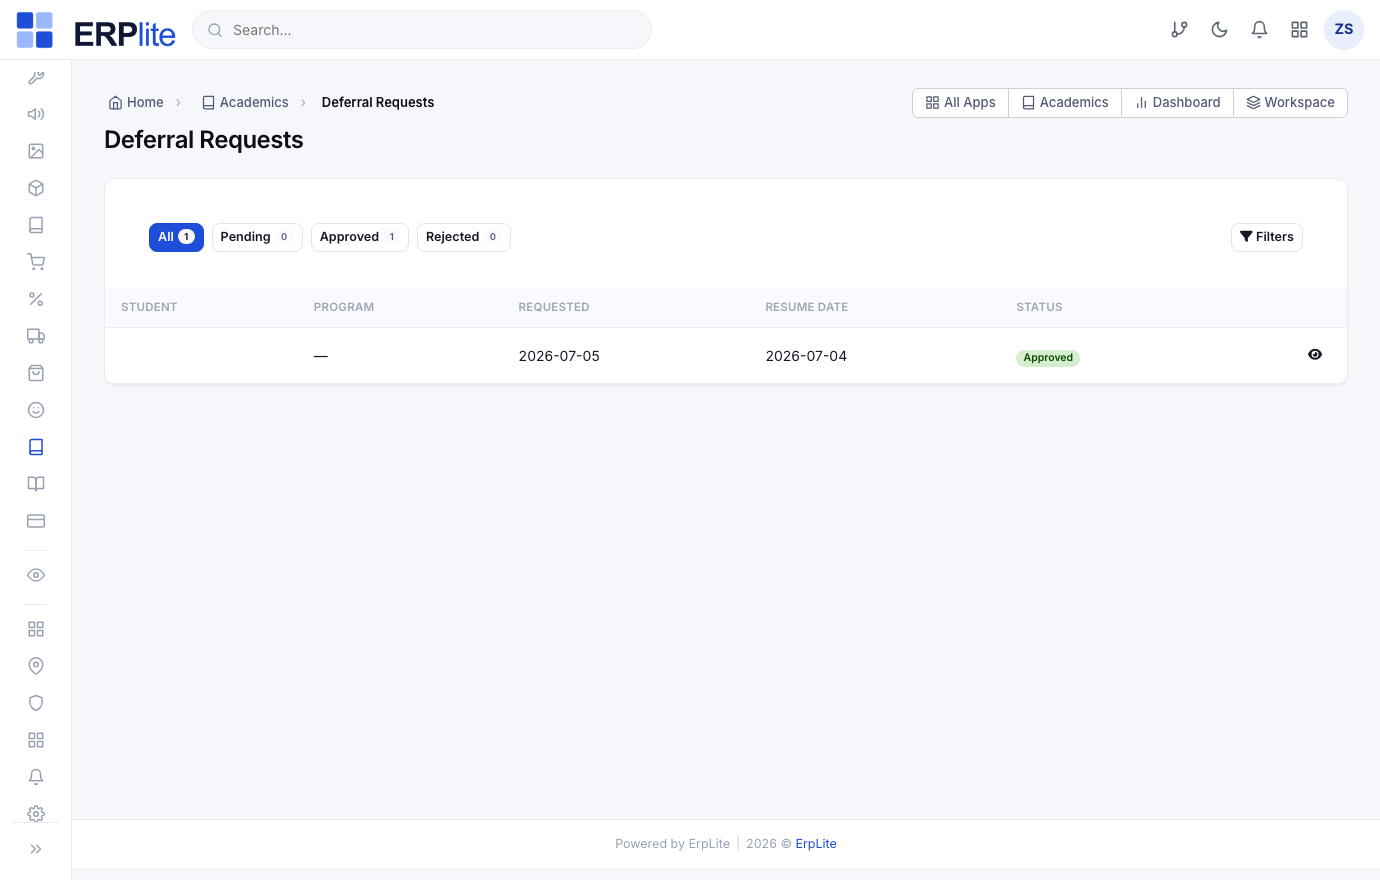
StudentStudent portal › Deferral Request · Admin/admin/deferral-requests
Submits the reason, the resume date, and a required supporting document. Withdrawal requests accept attachments too.
On approval the student becomes Deferred and the portal shows a clear deferred-until message instead of their pages. On the resume date they return to Active automatically (a daily scheduled task).
Payment status, queues & the portal gateحالة السداد
FinanceAcademics › Students/admin/students
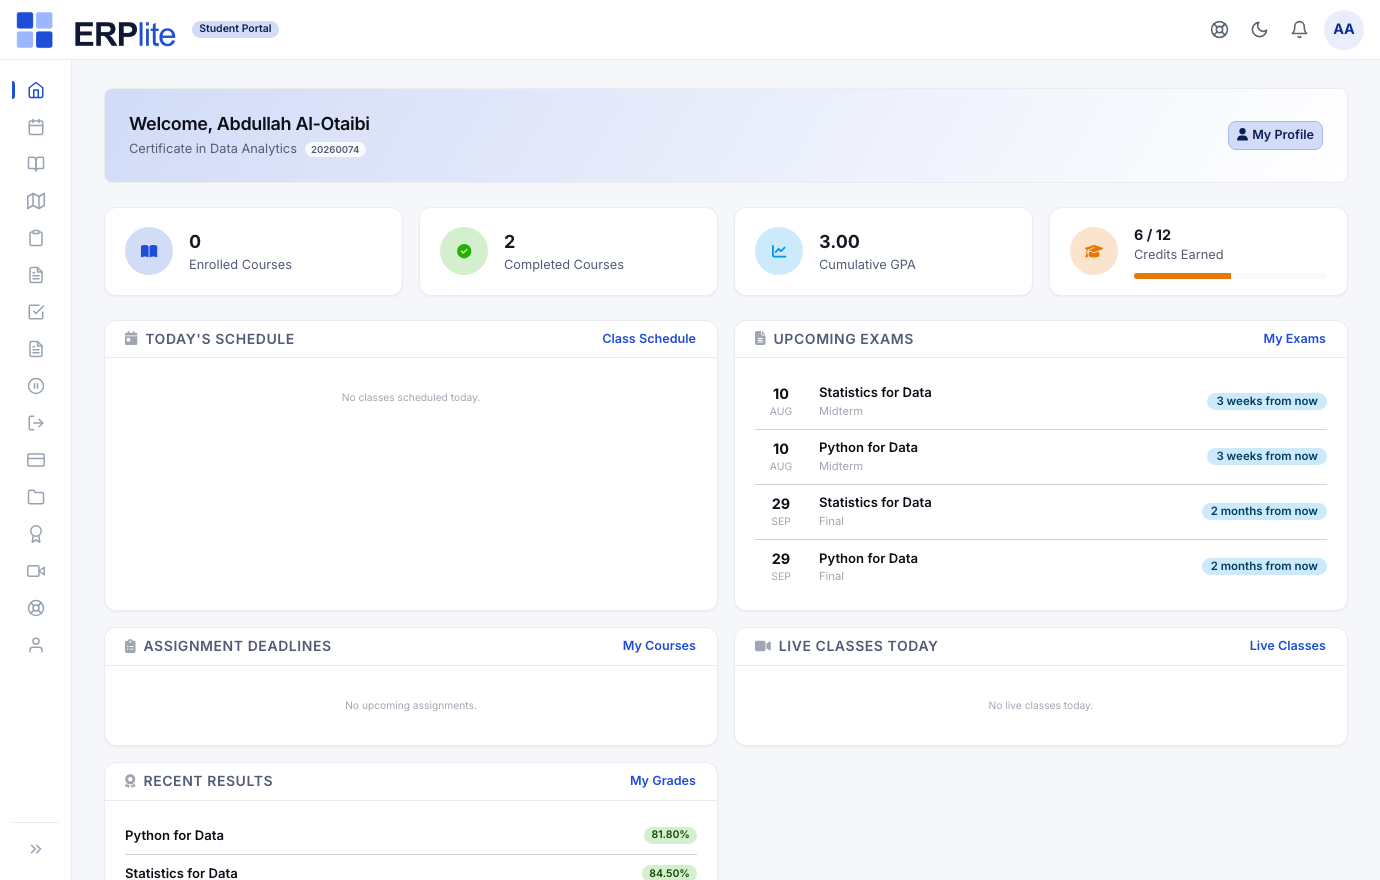
The students list has two queue axes — academic status and payment status (paid / not paid for the current term). Filter e.g. Active + Not paid, then send the current-term payment link to one student or in bulk. For a student who needs time, grant a dated portal-access exception from their page.
Derives each student status from their installment schedule and the current term, refreshing on every payment and term switch. Unpaid students are blocked from the portal except the My Fees page — paying online restores full access instantly. Deferred / withdrawn / excluded students are blocked entirely with a status-specific message.
Live classes & attendance
Online lectures run through Zoom, Microsoft Teams or Google Meet — connected once as integration addons — and every lecture feeds a smart attendance session that ends in a per-course status on the transcript (registered / passed / failed / withdrawn / debarred).
Connect a meeting provider & set the rulesالتكاملات · الإعدادات الأكاديمية
AdminSettings › Integrations › Live classes · Academics › Settings/admin/academics-settings
1) In Integrations, pick Zoom, Teams or Google Meet, paste the credentials, press Test, then Activate one provider.
2) In Academic Settings choose how instructors may start classes (via the provider, a pasted link, or both), the debarment absence threshold, and whether debarment applies automatically.
Creates real meetings through the active provider whenever a class starts. Zoom additionally reports started / ended / recording ready back through its webhook; Teams/Meet classes are closed by the instructor (or auto-ended after their duration).
Start the lecture & notify the classبدء المحاضرة
InstructorInstructor portal › Live classes/instructor
Picks the section, presses Start class (the provider creates the room, or they paste a link), and opens the meeting room. One page shows the class running now, scheduled ones, and the full history with recordings.
Marks the class live, opens today attendance session automatically, and notifies every enrolled student — portal bell, email/SMS/WhatsApp per the admin settings — with the join link. Scheduled classes also get reminders at configurable windows (default 60 and 15 minutes before).
Smart attendance → course statusرصد الحضور والحرمان
InstructorInstructor portal › Attendance · Student portal › My Attendance/instructor · /student
Picks the course, then the session labeled with its weekday and date from the schedule. Every status change on the roster saves instantly — no save button — then one Confirm signs the session off. Students who clicked Join on the live class arrive pre-marked present — unconfirmed with a joined badge; manual sessions start empty.
Computes each student attendance from confirmed sessions only (late counts as present; excused absences do not count against them). Crossing the absence threshold flags — or automatically applies — debarment (محروم), which blocks final grading until lifted. The transcript shows every course with its status: registered, passed, failed, withdrawn, debarred.
Who logs in where
Four audiences, three logins — each branded and scoped so everyone sees only what belongs to them. The two study portals default to the current term and can look back, never forward.
| Who | Where they sign in | What they can do |
|---|---|---|
| Staff / Admin | /admin | Everything in this manual — admissions, program placement, cohort placement, sections, enrollment, tuition, withdrawals, graduation and settings. |
| Instructor | /instructor | Their branded portal: current-term sections and rosters, attendance, grade entry & finalize, and the LMS for their sections. A past-term switcher; future terms hidden. |
| Student | /student | My Courses (term-scoped), My Grades & GPA, My Fees (installment schedule with Pay now on every due slice), My Learning, withdrawal requests, certificates & graduation, and — if enabled — self-registration. |
| Public applicant | website | Apply for admission, track application status, and accept or decline an offer — all without an account. |
Reading the badges
- ✓Automatic = the system does it for you. Staff / Registrar / Finance = a staff action in the dashboard. Instructor = done from the Instructor Portal or the LMS. Student = self-service in the student portal. Optional = only if your setup uses it.
- ✓Page paths shown as /admin/… are dashboard screens; /instructor and /student are the branded portals. The Arabic screen name under each step title is the label you will see in the live right-to-left interface — matching the screenshots throughout.